Since completing the first Andotrope proof-of-concept, I’ve been refining & improving the technology. Here’s version 2 – a lot has changed! I built v1 as a work of art, but I designed v2 to sit on your kitchen table as a real product.
Andotrope v2 with its domed glass lid
Andotrope v2 Main Improvements
It’s smaller – I built the original Andotrope proof of concept to look like a specific video game prop replica. This makes it big, bulky, uses a lot of decorative brass, and it has a lot of empty space in its base. I mean the hand crank is cool, but it’s a bit unnecessary. This updated Andotrope does away with all that while still opting for a minimalist, retro-Steampunk aesthetic. This shrunk the device to under half its old size.
It’s faster – now that I have a better understanding of what’s involved with creating an effective Andotrope, I’ve nearly doubled the rotational speed to 1800 RPM. This improves the persistence-of-vision effect.
It’s quieter – I’ve replaced the brushed motor and gearbox in v1 with a brushless drone motor and no gearbox. V2 is now whisper quiet.
Inside the base of my v2 Andotrope
It’s cheaper – the smaller, lighter size with less brass knocked 90% off the raw material price of this Andotrope and that’s not an exaggeration. What’s more, because it uses a common smartphone with a quick-release lid, you can simply use your everyday phone instead of purchasing a dedicated device, further saving money.
It’s optionally semi-transparent – I demoed this at Open Sauce in June 2024 – by simply swapping cylinders you can go from a solid black background to a semi-transparent background. How did I do this? That’s a secret 😉 Personally I prefer a solid black background as it’s hard to see the display with a transparent background, so I mainly demo it with a solid black background.
All these improvements put together, they represent a decent leap forward in Andotrope technology. I’m excited to see what the future will bring, because I already have versions 3 and 4 underway…
Publicity & Media
Version 1 achieved much professional acclaim. Here’s a list of some of my favourite features on Andotrope technology:
If you’re interested in turning an Andotrope into a real product or integrating the patent-pending technology into your systems, contact me to arrange licensing. I’d love to hear from you to make it happen.
Gradientment converts your 2D images into two overlapping 1D gradients & spits out the highly-compacted CSS used to generate these gradient maps, for perceived-faster progressive image loading or for artistic purposes. Sure, you could use a single flat average colour to represent the image until it loads… But that’s literally the bare minimum you could do, with zero spatial data represented. Gradient maps provide a little more definition, for as few extra bytes of bloat as possible. Only 100 extra bytes with the default settings! At higher values it transforms from a web tool into an art tool, creating interesting & unique plaid/tartan-like representations of images. Plaid-ify your images!
Drop image here or
4 5
– bytes
How to use Gradientment
If nothing works, you might need to disable your content blocker to let this page’s built-in JavaScript run.
Select an image on your device.
Adjust the number of Rows and Columns down as low as looks good for maximum compact representation, or all the way to the right for maximum artistic plaid representation.
Turn on OKLCH mode if you want extra accuracy/more muted colours in exchange for slower processing & another 18 bytes.
Copy the CSS into your project, either directly into the style tag on the specific image in your HTML (best option) or into your CSS matching the image’s ID tag (not as good but still a great option).
Repeat for any other images you want gradient maps for and enjoy!
Quick privacy note: all processing happens locally in your browser through plain JavaScript; images & results are never uploaded or shared anywhere. I have generic Analytics on this website to track page views etc, but there’s nothing tracking how you use Gradientment or the images you select or the gradient maps you generate. In fact you “should” be able to save this page to your device to use Gradientment entirely offline.
Additionally, you can see the gradient maps in action in a real-world test scenario on a live website (along with some progressive-encoded AVIF images if your browser supports them) in the first section of the Riven Journals, in the main temple and the close-ups of any journal before you open the book. I’ve also added gradient maps to the first/hero images of every article on this riumplus.com website.
But why?
As of mid 2026, modern web image formats like WEBP and AVIF have lackluster progressive rendering in web browsers. For WEBP, its progressive rendering is a suboptimal top-to-bottom style and it takes a while to show anything, waiting until both chroma channels have been downloaded first (and Safari shows no progressive rendering at all). For AVIF, standard-encoded images have no progressive rendering and only pop into view when fully downloaded. The AVIF spec does support progressive rendering though (except progressive AVIF rendering is currently broken on Firefox), and it is possible to generate files that do it, but it’s not the easy default “save from Photoshop” option (there’s a good article here about the state of progressive images which also details how to create progressive AVIFs if you’re interested). In short, actually seeing a flash of a progressively-loaded image is not as common as it used to be with an old-fashioned progressively-encoded JPEG.
But even if you stick with progressively-encoded JPEGs, there can still be a delay in seeing something if there’s a delay between your HTML parsing and your image’s data packets arriving. Like if you have a slow or intermittent internet connection, a poor/flakey WiFi or cellular signal, you’re running a faraway VPN or TOR connection, or if you’re connected to a slow web server on shared hosting. With a gradient map, you see something vaguely resembling your image straight away before your image has started to display – no matter the format and no matter how long the image takes to load. It doesn’t decrease the actual loading speed of your website (in fact it very slightly increases it), but it does increase your website’s perceived loading speed a little, so it feels faster.
Tools like Blurhash are great, but they fill a different, more complex niche – they usually require server-side processing of some kind, the delay of a round-trip packet to the server, and downloading/running more JavaScript. This is a solution that runs with pure CSS (old CSS that’s been supported for years, too), that usually displays within tens of milliseconds.
Why not just embed a base64-encoded image?
A 3×3 well-compressed PNG base64-encoded amounts to 168 bytes, and that’s not much definition at all; larger images are even bigger. A 3×4 gradient map is 100 bytes with each additional colour sample adding only another 5-6 bytes, even less when the page gets gzipped. What would you do to save a few bytes? Or to put it another way… For 100 extra bytes to your first/hero image or two, why not use gradient maps to have better perceived loading?
Hey I never said turning a 2D image into two overlapping 1D gradients was a practical idea in all scenarios, but I couldn’t find any evidence of anyone trying this technique before (though it must’ve been attempted by someone out there). So I created this tool, Gradientment, to easily generate them.
Consider it an interesting art experiment to make plaid versions of your images that’s fun to play around with if you don’t want to seriously use it on a website.
What’s OKLCH mode?
This enables linear OKLCH processing on both the gradient generation step as well as appending the tag to use OKLCH blending in the final CSS. Combined with the way pixel averaging is already performed manually by a box filter instead of using your browser’s built-in rescaler to make sure it’s done right, this produces much more perceptually-accurate colours. This matters the most in highly-saturated images. However it’s off by default because it’s much slower to compute, produces much more muted results, & takes up another 18 bytes in the final CSS. If you want, you can check the box to use OKLCH processing and manually remove the extra CSS tags to get the processing accuracy without the CSS “bloat”. It’s interesting to see how much of difference this checkbox makes on the final gradient map, though – even when the colours are compressed down to 3-character #RGB codes.
npm/pip/Wordpress plugins?
Sorry, I am an artist & inventor, not a coder. This is all you’ll get from me. Feel free to implement this technique yourself in whatever framework/language/system you like; I’m not about to claim ownership of the basic CSS used in gradient maps or anything! I’d love to add a link to your repo here.
Any other usage tips?
Gradient maps work best when an image has large, low-frequency changes in brightness or colour in either straight horizontal or vertical directions. Otherwise they can look a bit muddied and might not be worth implementing.
Adding decoding=”async” to any images used with this technique helps make sure any progressive version of the actual image will display as soon as possible on all browsers. In my experience, that’s an extra 15-30ms. Go on, you can spare a few more bytes for a few more milliseconds; look at how much you just saved by using a gradient map that uses compressed 3-character #RGB colour codes instead of those hugely-wasteful 6-character #RRGGBB colour codes!
I also advise against doing this technique as a blanket optimisation to every image on your entire website due to the CPU overhead of generating a huge number of blended gradients. Doing it to just the hero images displayed above the fold should be good enough.
Speaking of tips
Like Gradientment? Donate to my Ko-fi, comment below or drop me a line to say thanks! The more donations/encouragement I receive, the more likely I am to release more guides & tools like this in the future.
This is just a quick update to say that I’ve launched a new website for my Andotrope omnidirectional displays! Having a dedicated space to promote them makes it easier to share them with others. Plus, I think the new website looks pretty slick.
Things like the in-depth Andotrope buildlogs will stay here on this domain; it’s just the high-level show-off summary stuff I’m promoting to its own dedicated domain.
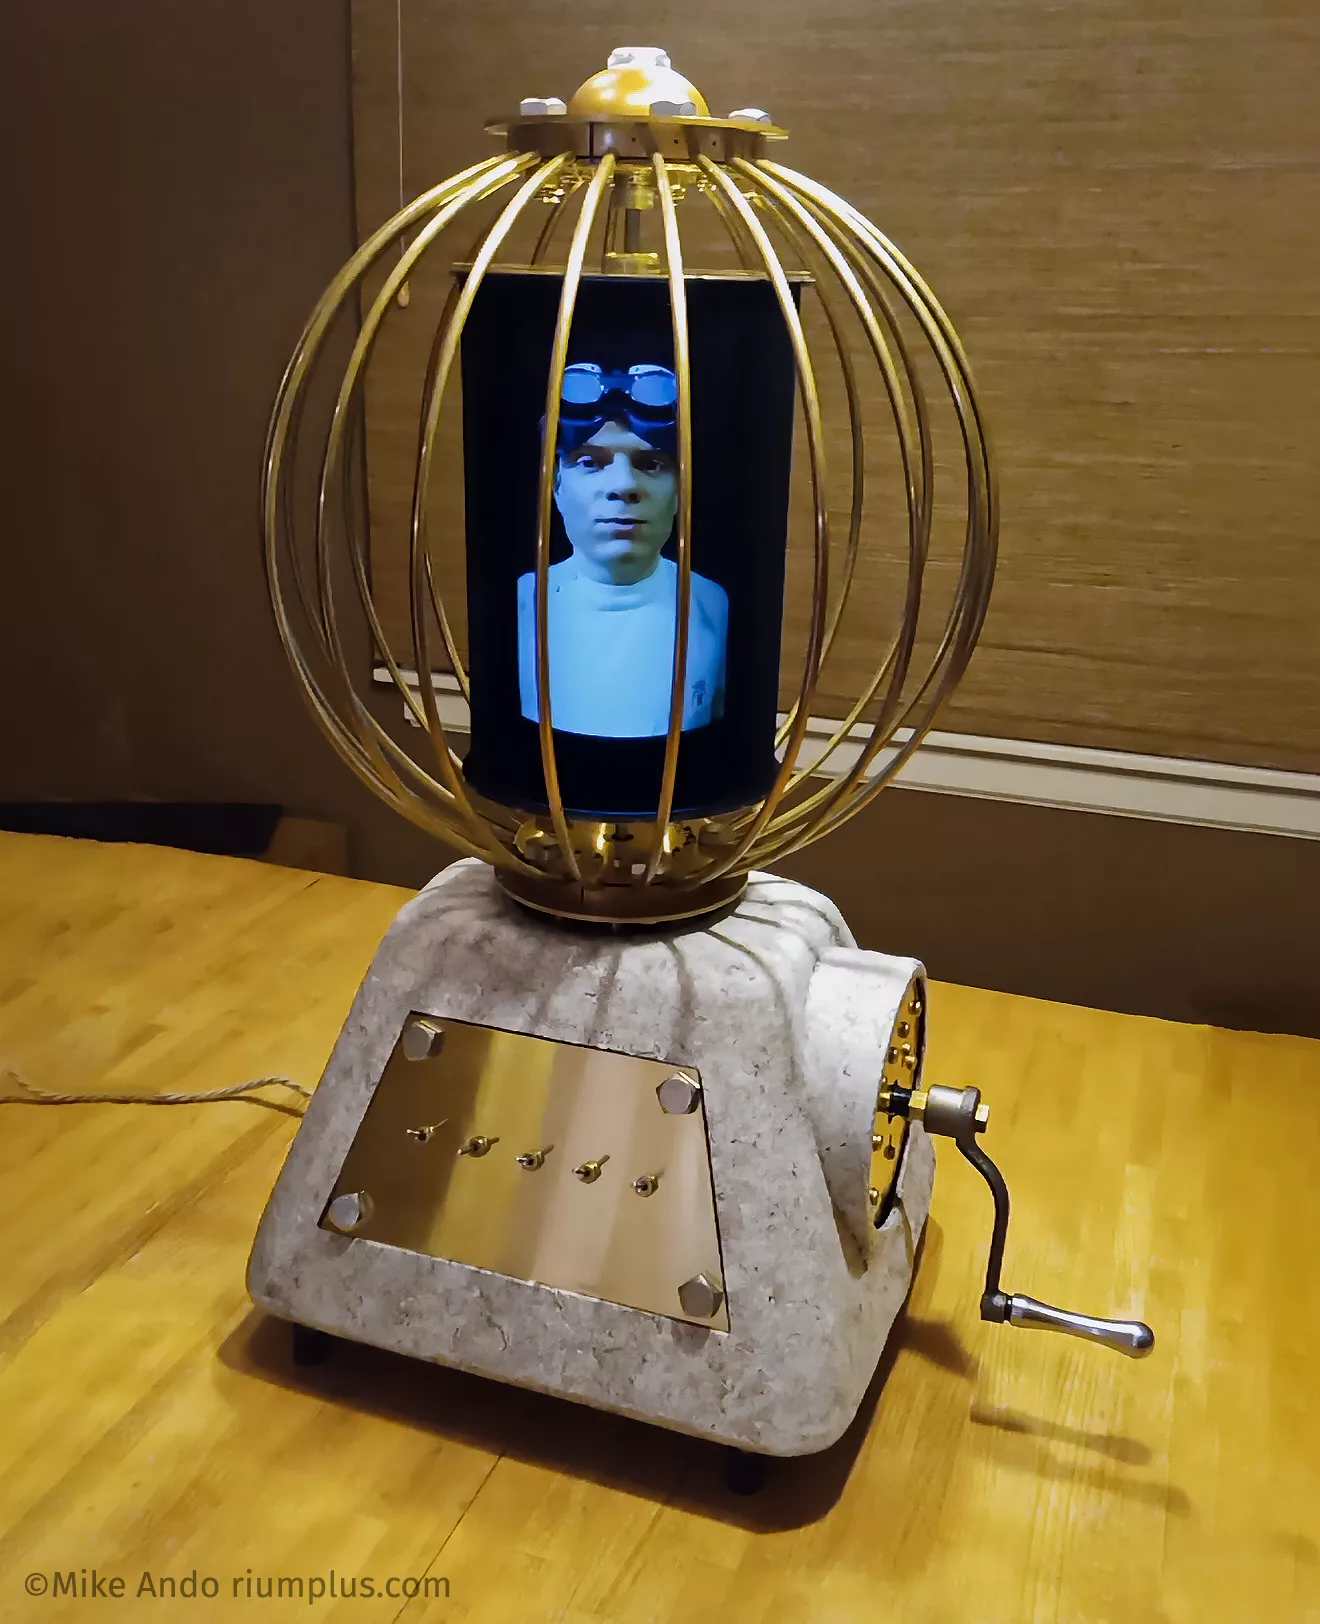
For my secret project for Mysterium 2023, I’ve spent the past 8 months making a replica of one of Gehn’s holographic Imagers from the game Riven: The Sequel to Myst… And thanks to some patent-pending new tech I’ve developed that I’m calling an Andotrope, I’m excited to say that the “holographic” part actually functions!
Here’s the contraption in action with zero video editing, CGI or other trickery:
There’s no CGI or video editing in the above video, it’s straight off my phone. There’s also no head-tracking cameras or special glasses or other tricks involved. Unlike the game version, the same image is visible no matter where you stand around it, and this works for unlimited simultaneous viewers. A whole crowd can stand around it and everyone will see not only the same image of a person, they’ll see that person making direct eye contact with them. This is actually far more useful than if it was just a floating head in space like in the game, where 3/4 people get a bad view as they’re looking at the back or sides of the head. It’s full-colour and full-HD.
How it works: the Andotrope
Readers are probably most interested in the Andotrope, which is the main mechanism in the middle that creates the omnidirectional holographic display. It consists of two specially-chosen tablets sandwiched back-to-back inside a black cylinder with viewing slits in front of the tablets, and the whole cylinder rotates at high speed (up to 1200RPM for mine, which gives an effective 40fps). Both tablets synchronise their output, effectively doubling the frame-rate by displaying two images per rotation.
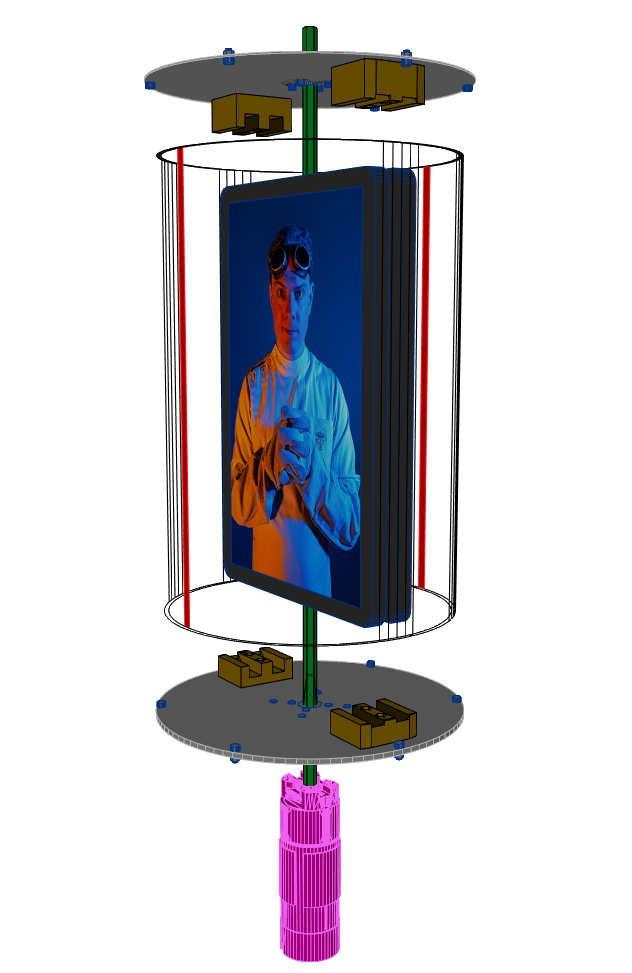
Andotrope exploded diagram. As the mechanism rotates, your view through the red slits sweeps across the displays, which ensures everyone in all directions ends up with a view of the full screen.
Andotrope with the external black cylinder removed, showing the internal components.
The effect is similar to a Zoetrope. Basically, I’ve brought a 150-year-old children’s toy into the 21st century. Because this doesn’t quite meet the definition of a Zoetrope any more, and because I couldn’t find anyone else who successfully pulled this off before, I’m calling any display you could build that’s similar to this by the generic term Andotrope. Here are the key differences between an Andotrope and a Zoetrope:
An Andotrope uses relatively few screens and can show infinitely-long animations, while a Zoetrope uses a dozen or more still pictures and is limited to showing only a second or so of looping animation.
An Andotrope’s screens & slits are arranged so that you don’t see multiple animations at once, while in a Zoetrope you can usually see through multiple slits to see multiple animations at a time.
Because it uses fewer screens & slits, an Andotrope rotates much faster to maintain an animation, rotating tens of times per second, while a Zoetrope might rotate only once per second.
All combined, the main purpose of an Andotrope is to provide an omnidirectional, bill-boarding holographic* video to multiple simultaneous viewers in all directions.
(*a note on the word “holographic” before I go any further: you could potentially argue that by the dictionary definition, this isn’t a holographic display. I spent a few days straight trying to figure this out & still came away confused; it’s hard to classify new technology under existing terms. In short, the meaning of “holographic” that everyday people have been using for a while now doesn’t match the dictionary definition at all, with things like spinning LEDs, VR headsets like the Meta Quest and even nail polish often described as holographic. It’s similar to how you can call someone the opposite words “cool” and “hot” at the same time, and neither description has any relation to the original dictionary definitions of those words of their temperature. The decision as to if it’s a holographic image ultimately depends on whether you lean towards prescriptivism or descriptivism. I’m using that word here because whatever your opinions on the matter, at the end of the day that’s the most likely word that most people will use when searching for this device in Google etc and I need to make sure people can find this project. You have my full permission to go wild making comment threads arguing if this does/doesn’t count as holographic, just don’t @ me unless you at least know the difference between a hologram and a holograph)
It’s not an exaggeration to say I couldn’t find any other examples of people successfully pulling this off before; I searched to the literal last page in Google Image Search for terms like “Zoetrope LCD”, “spinning LCD”, “tube POV display”, “cylindrical POV LCD” etc and turned up nothing. Because of this, I’m happy to announce that this display tech is now covered under Patent Application 63/511,582!
It seems I’ve accidentally invented new technology in my quest to make a video game prop more screen-accurate. Um. Oops?
This kind of display has a wide range of applications. I’m going to get a little promotional here but imagine being in a boardroom meeting video call and the boss is in the centre of the table, so everyone sees a clear view of them. Imagine a restaurant table with this in the middle, a digital assistant taking your orders, playing games with you until your food arrives. Imagine this on your kitchen island table showing the weather, currently playing music & other information from your Virtual Assistant, viewable no matter where you’re standing. Imagine those cylindrical advertising posters/screens, but everyone all around always sees the intended view. Imagine theme parks with these futuristic displays around the place. Imagine board games with friends, with this in the middle of the table, the dungeon master talking & pointing to YOU. Anywhere people are in a group where you currently look at a display to one side, this puts the display in the middle of the group. It’s effective. It’s practical. It’s achievable. And it’s relatively cheap.
If your company is interested in commercialising or integrating this tech into your systems, contact me to arrange licensing (obviously just the Andotrope part, not the video game replica parts like the brass cage or base).
There’s lots of fine-tuning to make the visual effect actually work, and selecting the right displays is crucial. I used the Blackvue Tab 10 as it was a good compromise of all requirements. Most important is that the displays must have almost zero flicker since any flicker becomes visible at high speeds, which unfortunately rules out most OLED and a lot of LCD screens that either purposefully flicker the pixels/backlight at a high frequency for dimming or their driving circuitry has a slight voltage ripple that’ll show up. You also want the brightest displays you can get, as a thinner viewing slit means a crisper but darker image – a 5-degree viewing slit means you only see 1/36th the display’s original brightness. Picking displays that are as light as possible makes balancing them easier, and as thin as possible is good for reducing the distortion curve in the final video. Finally, they need to be rugged enough to survive what’s effectively the speeds of a washing machine spin cycle; this is an occasion where devices with poor repairability that have been fully glued shut can sometimes be preferable.
The Andotrope display without the Imager’s brass cage, demonstrating that the final display you see is actually curved. The video is Catherine’s Escape from Riven.
To get the best contrast ratio possible, the outside of the cylinder is coated in Musou Black VL fabric as a compromise to find the blackest black that will hold up to the centripetal forces. My experiments with paints revealed that they didn’t like to stay attached to acrylic spun at high speeds, and the famed “Black 3.0” paint isn’t actually as dark as this fabric. The viewing slits were covered in a layer of 3M anti-reflective film.
Multiple layers of Black 3.0 paint on a Toy DeLorean’s bonnet vs Musou Black VL fabric under a bright light. The fabric is noticeably darker than the paint.
How it’s built: the Imager’s brass cage
The whole imager is actually only 60% scale of the original in-game one, because the original was just impractically large and everyone who has seen it in-person (including the game’s creators) thinks my one is the right size & big enough. The spherical cage is constructed of around 12 metres (40 ft) of 6 mm brass tube. The 20 segments were professionally bent, cut to length, filled with resin to provide extra strength (don’t forget these tubes hold the top of the Andotrope in place, meaning they’re structural), and a hole drilled through each end. They’re secured at the top & bottom by a bolt going through that hole, through a 3D-printed holder, to a Stainless Steel plate. There’s a matching second 3D-printed holder that goes on the inside of the cage, sandwiching the tube in place between both holders. The penta-bolts squeeze both 3D-printed holders together, firmly gripping all the tubes.
I applied a clear coat to the most of the brass to preserve its shiny appearance, while leaving the cage tubes untreated to allow them to develop a natural tarnish over time. Here’s what the inside of the mounting points look like to give you a sense of how complicated they are & how fiddly it was to assemble this in the limited space.
3D-printed components
I divided the 3D-printed holders into 5 segments, because I held true to the spirit of Riven/Gehn to that level of detail. Modelling them presented challenges such as matching the curves of the tubes, ensuring proper clearance for bolt heads and access for tightening bolts, optimising the design to minimize resin usage, and incorporating drainage holes for improved printing. All of which is millimetres (or sometimes under a millimetre) away from one another. They represent the most densely complicated parts I’ve modeled and printed to date. They’re super pretty though.
I designed four 3D-printed grips that securely hold the tablets in place and can be adjusted to balance the device. These were honeycomb-hollowed not only to save resin but also save a few grams of weight since they are part of the rotating mechanism. Including the spherical dome on top, this makes the total number of resin 3D-printed parts… 25. Gehn’s extra favourite number. Mwahaha.
The base case was FDM 3D-printed in 4 parts out of PLA+, a corn-based plastic. Modelling & optimisation took around 30+ hours for these parts, with an additional approximately 70 hours for printing. The quarters were bolted together then covered in flexible automotive putty and painted up to resemble rock. The interior was coated in noise & vibration-absorbing paint to help make moving parts as quiet as possible.
The Imager’s base
The Imager itself stands as its own work of art. I wanted it to be as authentic to the game as possible, so metal was used for a lot of the internal and external components. 3D printing, laser cutting, resin casting etc all have their places (and all were used to create this device in other areas) but none match the aesthetic appeal of actual brass. The long-necked three-way toggle switches on the front are all made of stainless steel, while the brass panel they’re attached to serves as both the access panel for the internal electronics and features an exciter on its back, so the entire panel functions as an invisible speaker. The Imager’s handle is made from machined stainless steel, mounted on a cast iron crank, connected to a brass axle, which in turn is attached to a dynamo designed for wind turbines. As a result, you can feel the weight and resistance of real metal in your hand, while it actually generates electricity and produces the right kind of whirring sound, resembling a proper machine rather than a plastic toy. Since human output is too intermittent to reliably power the device, I incorporated a power cable made of mains-rated braided twisted jute, to maintain consistency with the overall design aesthetic.
Altogether, the Imager weighs 13 kg (29 lbs), stands 71 cm (28 in) tall, and utilises over 300 bolts. Speaking of bolts, yes, those are 5-sided pentagonal bolts, or “pentabolts”. Just like Gehn used in the game. And every single one serves a structural purpose; none are merely decorative additions. I meticulously sanded off the stock markings from each bolt to maintain the 90s-basic-3D-model-shape aesthetic without any distractions. I sourced mine from McMaster-Carr.
I have to share these 3D wireframe views even though I know it’s a bit hard to see anything in them because they illustrate well the amount of complexity inside the machine. Plus, the top-down view looks a bit like an Iron-Man-style Arc Reactor. And when you’re creating things that accidentally resemble Iron Man’s equipment, that’s a sign you’re on the right track.
Internally, things are built from a mix of Aluminium to save weight, Stainless Steel where more strength is needed, pure steel for the device’s main axle, and brass where it would be visible (always the thinnest sheet I could get away with to save weight & reduce costs). The main internal structure is constructed using T-slot, opting for their slightly higher strength compared to V-slot. The mechanics come from goBILDA, a company that specialises in robotics competitions, but they’re also great for quick prototyping with all their components using a well-thought-out modular grid system. I strategically placed rubber washers and rubber sheets throughout the device to minimise machine noise & vibration. My cat Lana supervised the assembly process, because the Internet insists that all decent build logs should include at least one picture of a cat.
Electronics
Due to the intermittent nature of a human turning the crank/dynamo, the imager is powered by a Meanwell 12V power supply that accommodates both 110V & 230V. The motor driver is a DFRobot DRI0042, with an Arduino Pro Mini acting as the motor controller. A Raspberry Pi 4 with an attached DAC+ shield for audio output serves as the heart of the machine that controls all the other components. To prevent voltage spikes or reverse current from motor braking, a Pololu Shunt Regulator is used to keep the voltage below 13.2V.
The electronics inside Gehn’s Imager that drive the Andotrope display (only some of the wires are connected in this photo). From left to right: 12V Meanwell power supply, Pololu Shunt Regulator, Raspberry Pi 4 with DAC+ shield, Arduino Pro Mini, DFRobot DRI0042 Motor Driver.
Although the game version of the Imager doesn’t have them, I added five three-way toggle switches and a brass panel to control it. The first switch controls the power. The second switch controls the speed, with settings of roughly 20fps, 30fps or 40fps. Slower speeds produce quieter operation, while faster speeds result in a more stable image. The third switch adjusts the volume. The third, fourth and fifth switches are for video selection, offering a total of 27 available videos. Speed and volume adjustments can be made at any point during the Imager’s operation.
One significant aspect to making the Andotrope work is that all communication between the Raspberry Pi and the tablets occurs over Wi-Fi. Physical wired connections, such as brushes or slip rings, aren’t reliable for high-bandwidth data connections, and I know some have said that Wi-Fi can become unreliable at high speeds, but I haven’t noticed any issues in this application. MQTT handles the basic communication, and optimisations have been made to minimise latency so the tablets stay synchronised. For example, dummy packets are sent every 8 seconds to prevent the Wi-Fi chips from entering low-power mode. And because all communication happens via Wi-Fi, I can also control every aspect of this Imager from my phone – including playing back extra videos that aren’t on the switches.
I wrote a custom app for the tablets to handle network communications & play videos (though you can also run any other app to watch something on YouTube, video chat, play a game, etc). The tablets’ backlights dim in between videos to conserve battery life and maintain a visually seamless black appearance of the cylinder. This also means the tablets’ batteries last a full day between charges.
The Dabber
In case I ever need to manually use the tablets due to a pop-up menu or something, my other half created this neat little device we named “the dabber”. It’s made out of hand-carved leather & thread with a wooden handle. A conductive stylus tip is attached to the end, with enamelled copper wrapped around it down to the handle to give it sufficient capacitance. It fits through a small hole in the top of the cylinders, and when you rotate the spindle on the handle, it bends over in that direction. Removing the tablets from the brass cage requires significant disassembly, but this plus the small amount of space you get by lifting the end cap off the cylinder is enough access. If a lot of tapping is needed, a Bluetooth mouse does the job.
The Dabber. A custom tool made of wood, hand-carved leather & thread designed so you can use the tablets inside the Andotrope/Imager without removing them.
There’s lots of ways you can iterate on the Andotrope design, some of these I intended to implement but I ran out of time before the presentation. I’m sure some people interested in licensing this tech will be interested in developing some of these ideas further. Here’s a few of them:
Wireless power, eliminating the need for manually recharging the tablets. I bought the coils for this but I didn’t have enough time to wire them in.
Anaglyph/Red-Blue Glasses 3D. Right now, this is just a matter of playing a correctly-formatted video.
Polarised Glasses 3D by using different polarising filters on each tablet. I had planned to implement this feature, but once again, I ran out of time.
Different numbers of screens. I used two screens as they conveniently balance themselves and give you twice the brightness, but there’s no reason there couldn’t be 1, or 3, or even 5. Higher numbers increase cost & complexity but provide a brighter image with reduced spinning speed for the same equivalent frames per second.
Different sizes are definitely possible, from a small cheap phone-sized Andotrope to a larger monitor-sized screen. The main limit for larger sizes is overcoming centripetal forces. A cost-effective “BYO device” version could also be developed for different sized phones/tablets.
By carefully synchronising the timing, frames could be synchronised across screens so each one always shows a different frame vs showing identical frames. When streaming content to two screens via Wi-Fi, this could reduce the amount of data sent by half.
Using displays with very high frame rates and carefully synchronising timing, you could present different images to different directions simultaneously. Then you really could show some viewers the sides and back of someone’s head.
Alternative screen technologies can also be used. OLED would be awesome if it didn’t flicker, particularly a flexible OLED that you curve so the final image appears flat. I investigated both transflective and e-ink tablets for this device, as you could front-light those with very bright LEDs, but all currently available options had poor contrast ratios.
The enclosure doesn’t necessarily have to be solid. You could use something like privacy film, shuttered lenses, or other techniques to make sure the light from the screen only goes in the direction of the viewing slit, and the rest of the enclosure could be open. Make a significant portion of the enclosure open would result in a partially transparent display. I really wanted to do this but just couldn’t manage it in the limited time I had. There’s no reason the enclosure has to be a cylinder, either.
Positioning optics either in front of the tablet or at the viewing slit to better direct the screen’s light. This would increase the display’s effective brightness, and it could also be used to reduce display distortion.
Addendum: other videos, assembly photos
Below are additional videos of other content currently loaded onto the Imager.
The original Andotrope proof of concept – a rugged phone, inside a tomato soup can painted black & sliced open, hot-glued to a pedestal fan. Hacky as all heck, but it proved the concept works.
Riven: Moiety Sickle. This is exclusive new content from the remake of Riven, not the original. This is an earlier video from before I fine-tuned the synchronisation code.
Here’s a few action shots of the assembly process.
Partially-assembled selfie!
Assembling the imager.
Assembly yoga.
Finally, if you like the Andotrope technology at the heart of this video game prop replica, you should check out my version 2 Andotrope proof of concept. It’s smaller, faster, quieter and cheaper – aka better in so many ways!
It’s Riven‘s 26th anniversary! In honour of the occasion, I’ve spent roughly 350 hours upgrading the Riven Journals, marking their largest and most significant update since their original restoration in 2006.
What’s New:
Implemented support for mobile/tablet touch devices, with adjusted & enlarged click/tap areas throughout. Puzzles using drag-and-drop mechanics have been modified to incorporate larger touch zones & pieces now snap to their correct positions when placed close enough (good puzzle design says the challenge should be the puzzle itself, not navigating the puzzle’s user interface)
Dynamic zooming customised per page, so the content originally designed for 640×480 CRT monitors no longer looks like a postage stamp on your widescreen 4k monitor (also scales to the maximum possible size on your phone/tablet to make seeing things easier)
AI upscaling to 4k resolutions to all images so it doesn’t look like a blurry mess on big screens, with an option on every page & integrated into every puzzle to switch back to the original images (worry not purists; the original images are still there, completely untouched, and will never go away!)
The entire server codebase has been completely rewritten from the ground up, replacing three old languages with only current-day PHP 8.2 (running server-executable code just to deliver plain HTML is, like, so 1996)
Numerous changes throughout to leverage modern web features for improved functionality, speed & accessibility (eg prefetch/preload, img srcset, cursor & draggable hints, alt text, async decoding, etc)
A hints, tips & solutions section added to my main Riven Journals page. Get stuck & need help? Just want to look at the rewards? Got ya covered!
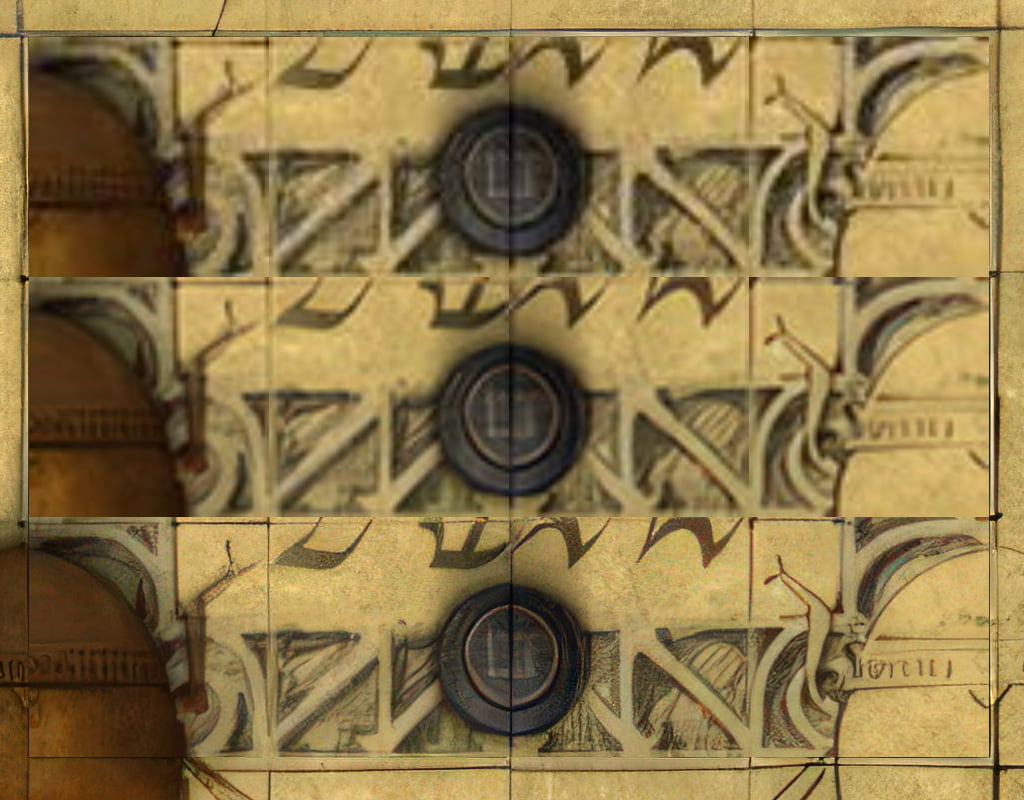
Journal 1 puzzle. Top row: the original 1997 images Middle row: upscaled but original resolution with less compression Bottom row: 4x upscaled
In the spirit of full disclosure, I used Topaz Photo AI for the majority of the AI upscaling. This means it’s not the controversial generative AI but instead upscaling AI. The models used were trained exclusively on content licensed for use in AI training, it was run locally on my computer not in a datacentre, it was powered by my house’s solar renewable energy, and no water was consumed for cooling. I hand-tuned the model & parameters of each image for the best quality one at a time, generating four different resolutions up to 4k, which was most definitely not a quick basic bulk export. This included regenerating a version at the original resolution but without the original’s heavy jpeg compression. These were all integrated into the Riven Journals’ ~250 HTML files manually using Notepad++, and the HTML has ballooned to almost 5 times its original size. This represents around 2,600 images manually added into the Journals via srcset, with a total of around 5,800 images involved when counting individual frames of animated gifs and uncompressed versions (but not counting the many thousands generated, edited, integrated, then tossed out & recreated from scratch when I found a higher quality technique). Additionally, I manually processed around 1,100 of these upscaled images through Photoshop for touch-ups, once again by hand one at a time. I compressed all final images individually with mozjpeg, pngquant & FileOptimizer to get the most bang-per-byte like was necessary in the dial-up days of 1997 to get the fastest load times. In short, this was absolutely not a simple load-export-dump-and-overwrite job but one where each image upscale was processed one at a time, by hand, with the care and attention to detail they individually deserved.
Despite my best efforts, I’ll be the first to admit that the upscaled versions aren’t always better than a basic blurry bicubic resize of the originals, but I think they look better more than 95% of the time. There’s a button to compare them with the originals on every page & every puzzle (though some puzzles only update to reflect the change upon the next action like clicking on pieces etc). That button’s also useful for investigating situations where the upscaled version looks weird but it turns out that’s because the original images lack sufficiently clear detail for proper extrapolation, or where the originals also look weird too and the upscales are faithfully replicating that oddity.
That said, here’s some examples of the upscaling in action!
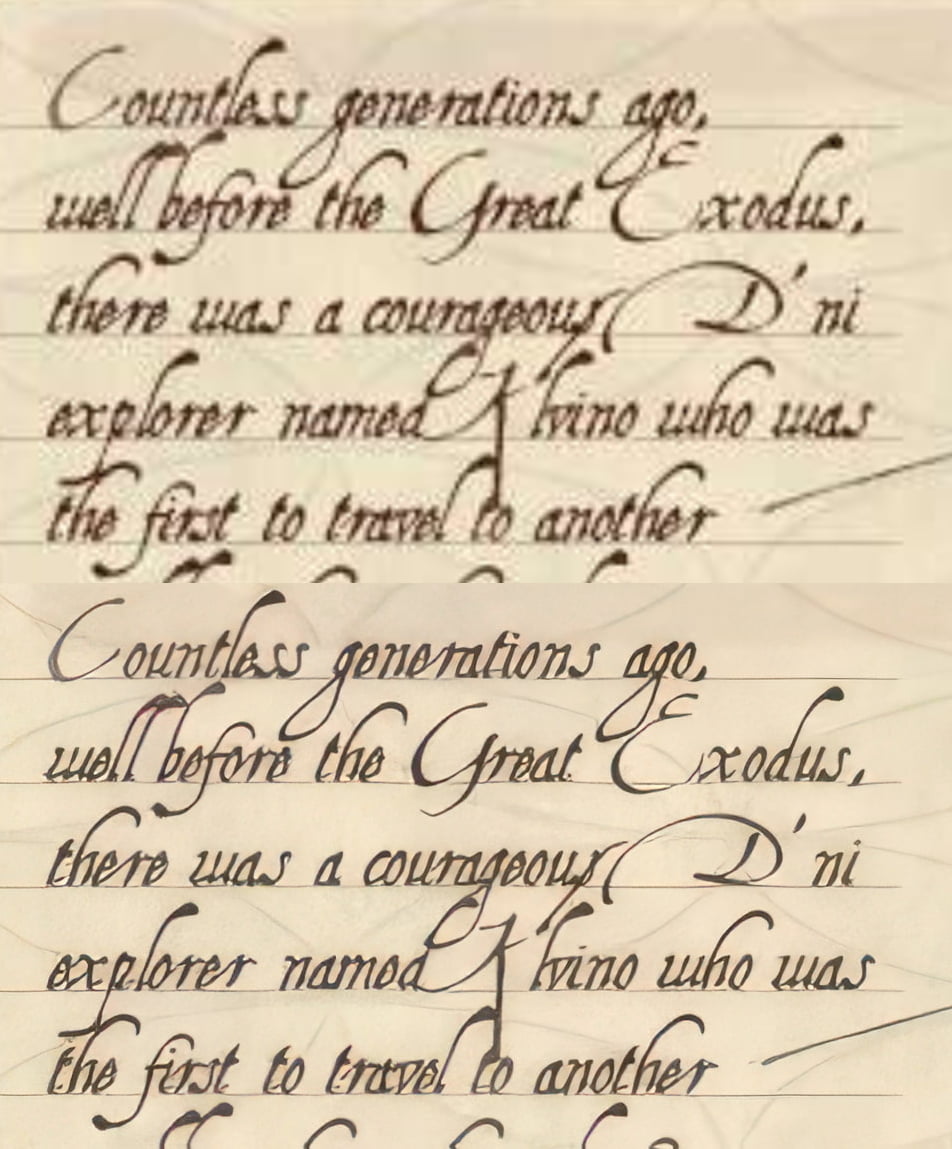
Text example – original version above, 4x upscaled version below
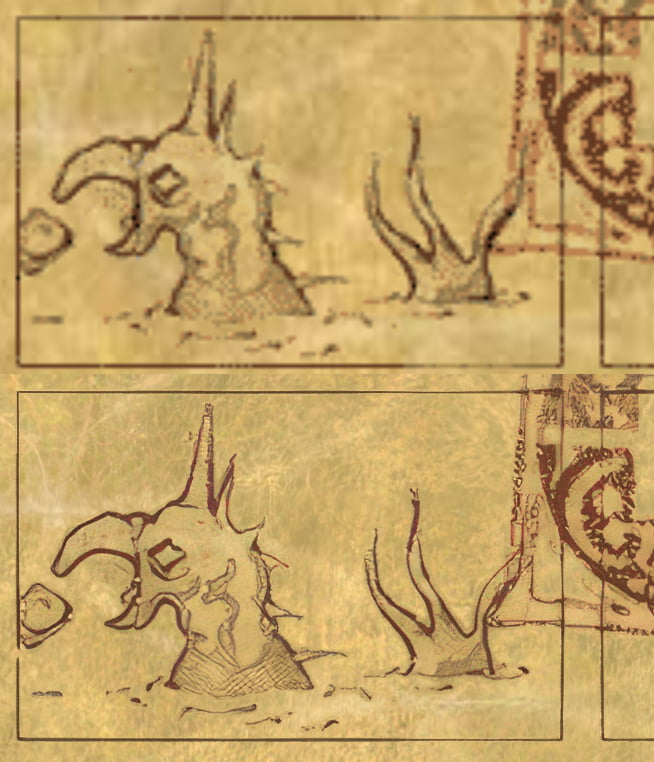
Line art example (this one’s actually a reddish transparent .gif floating above the tan-coloured parchment background) – original version above, 4x upscale below
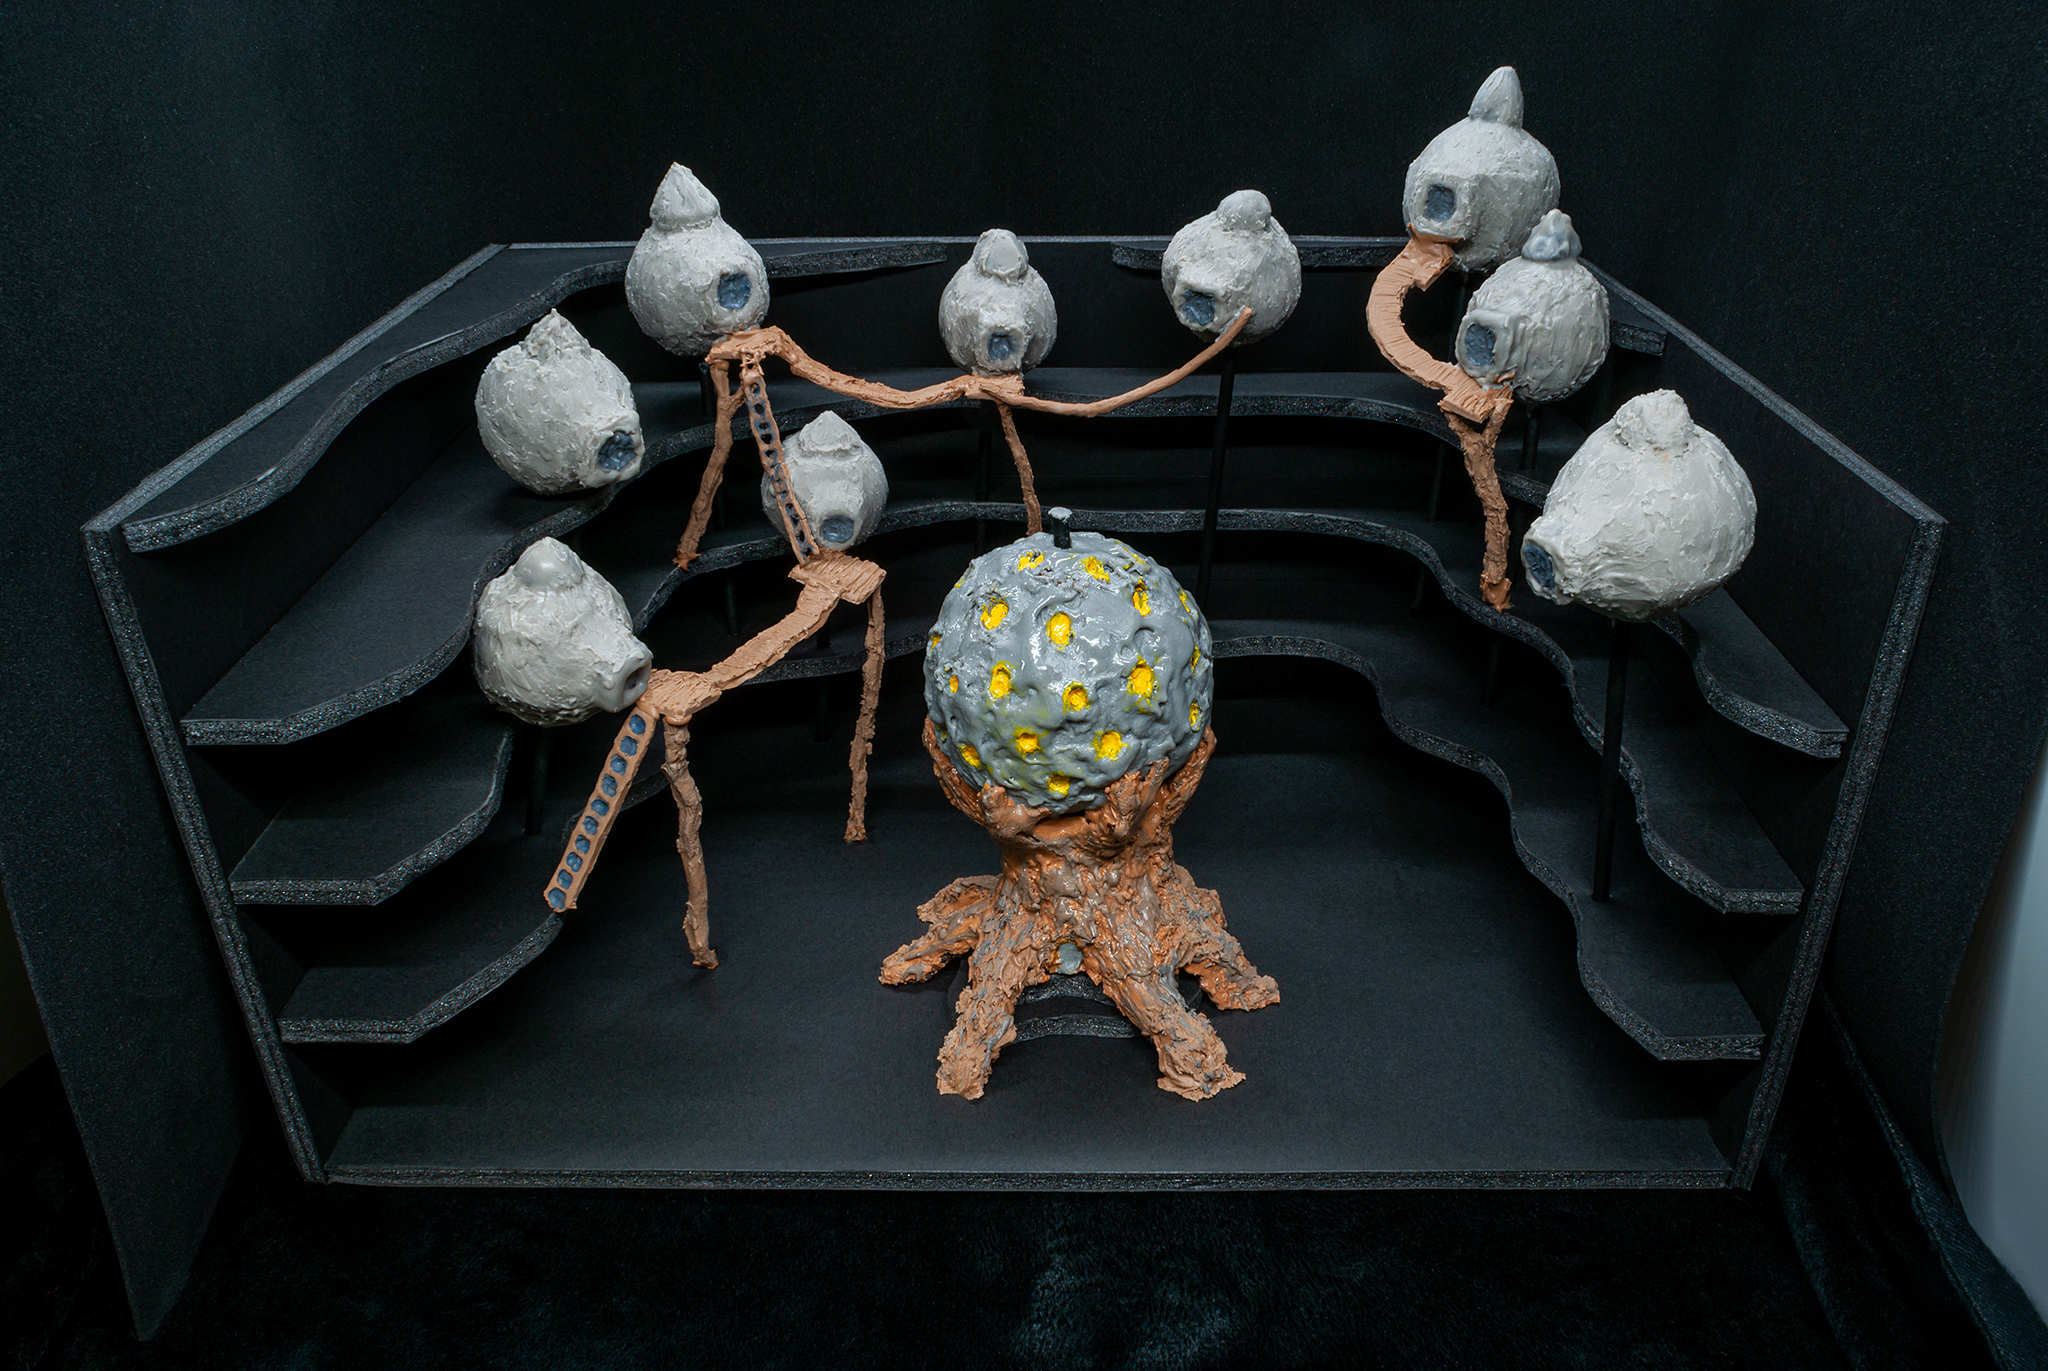
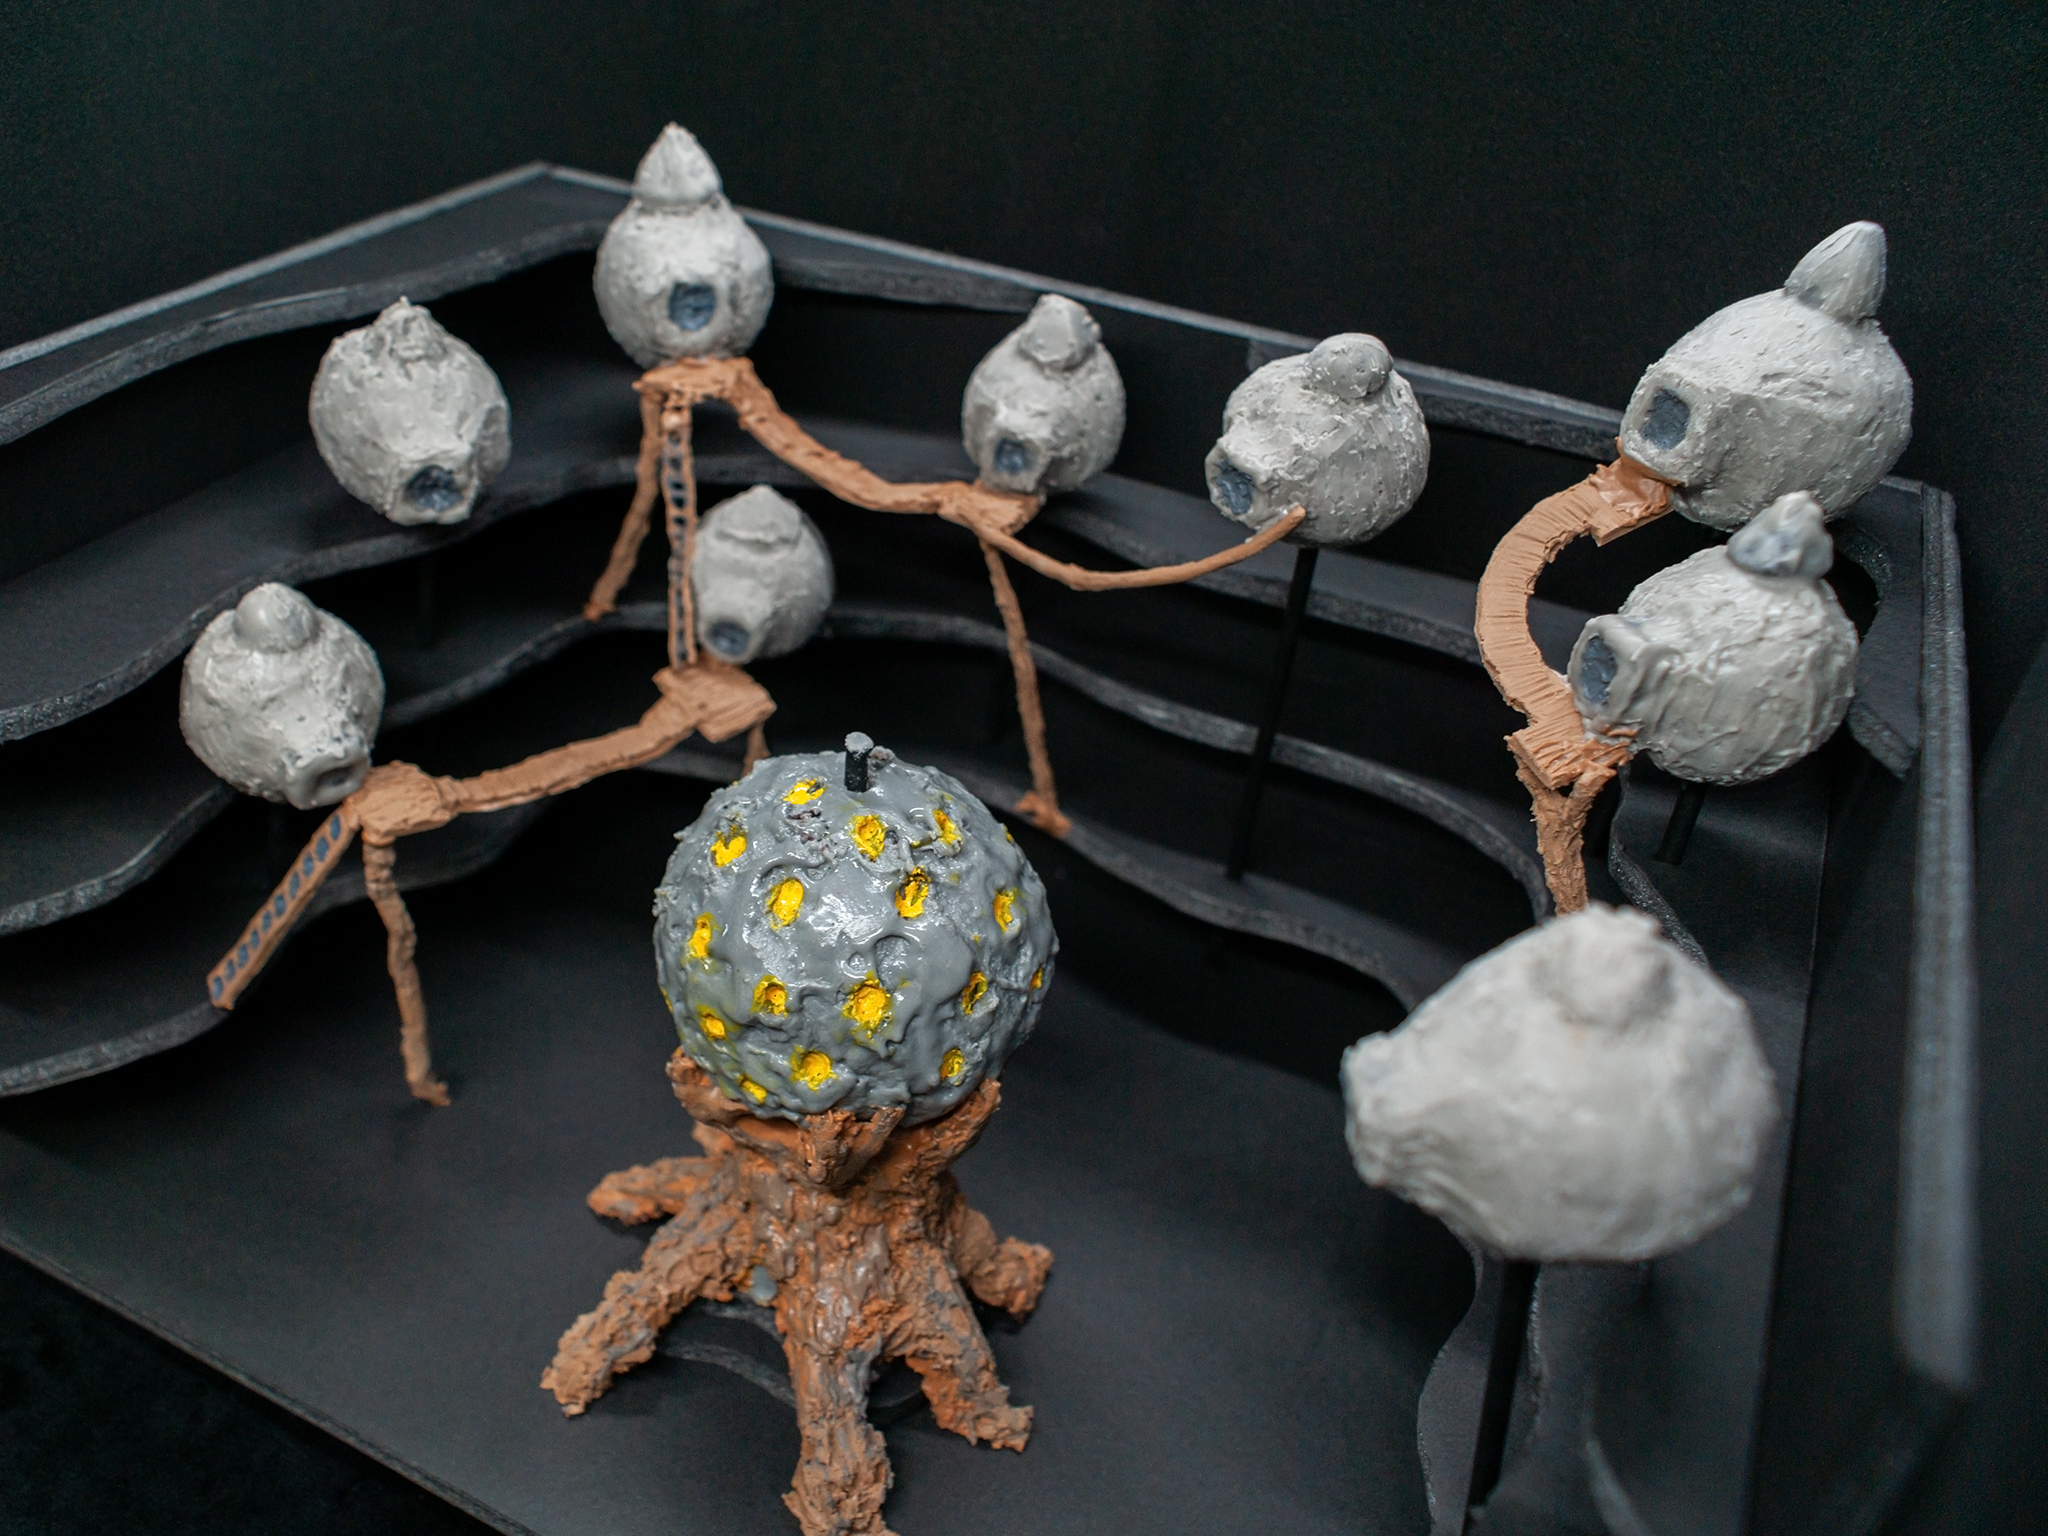
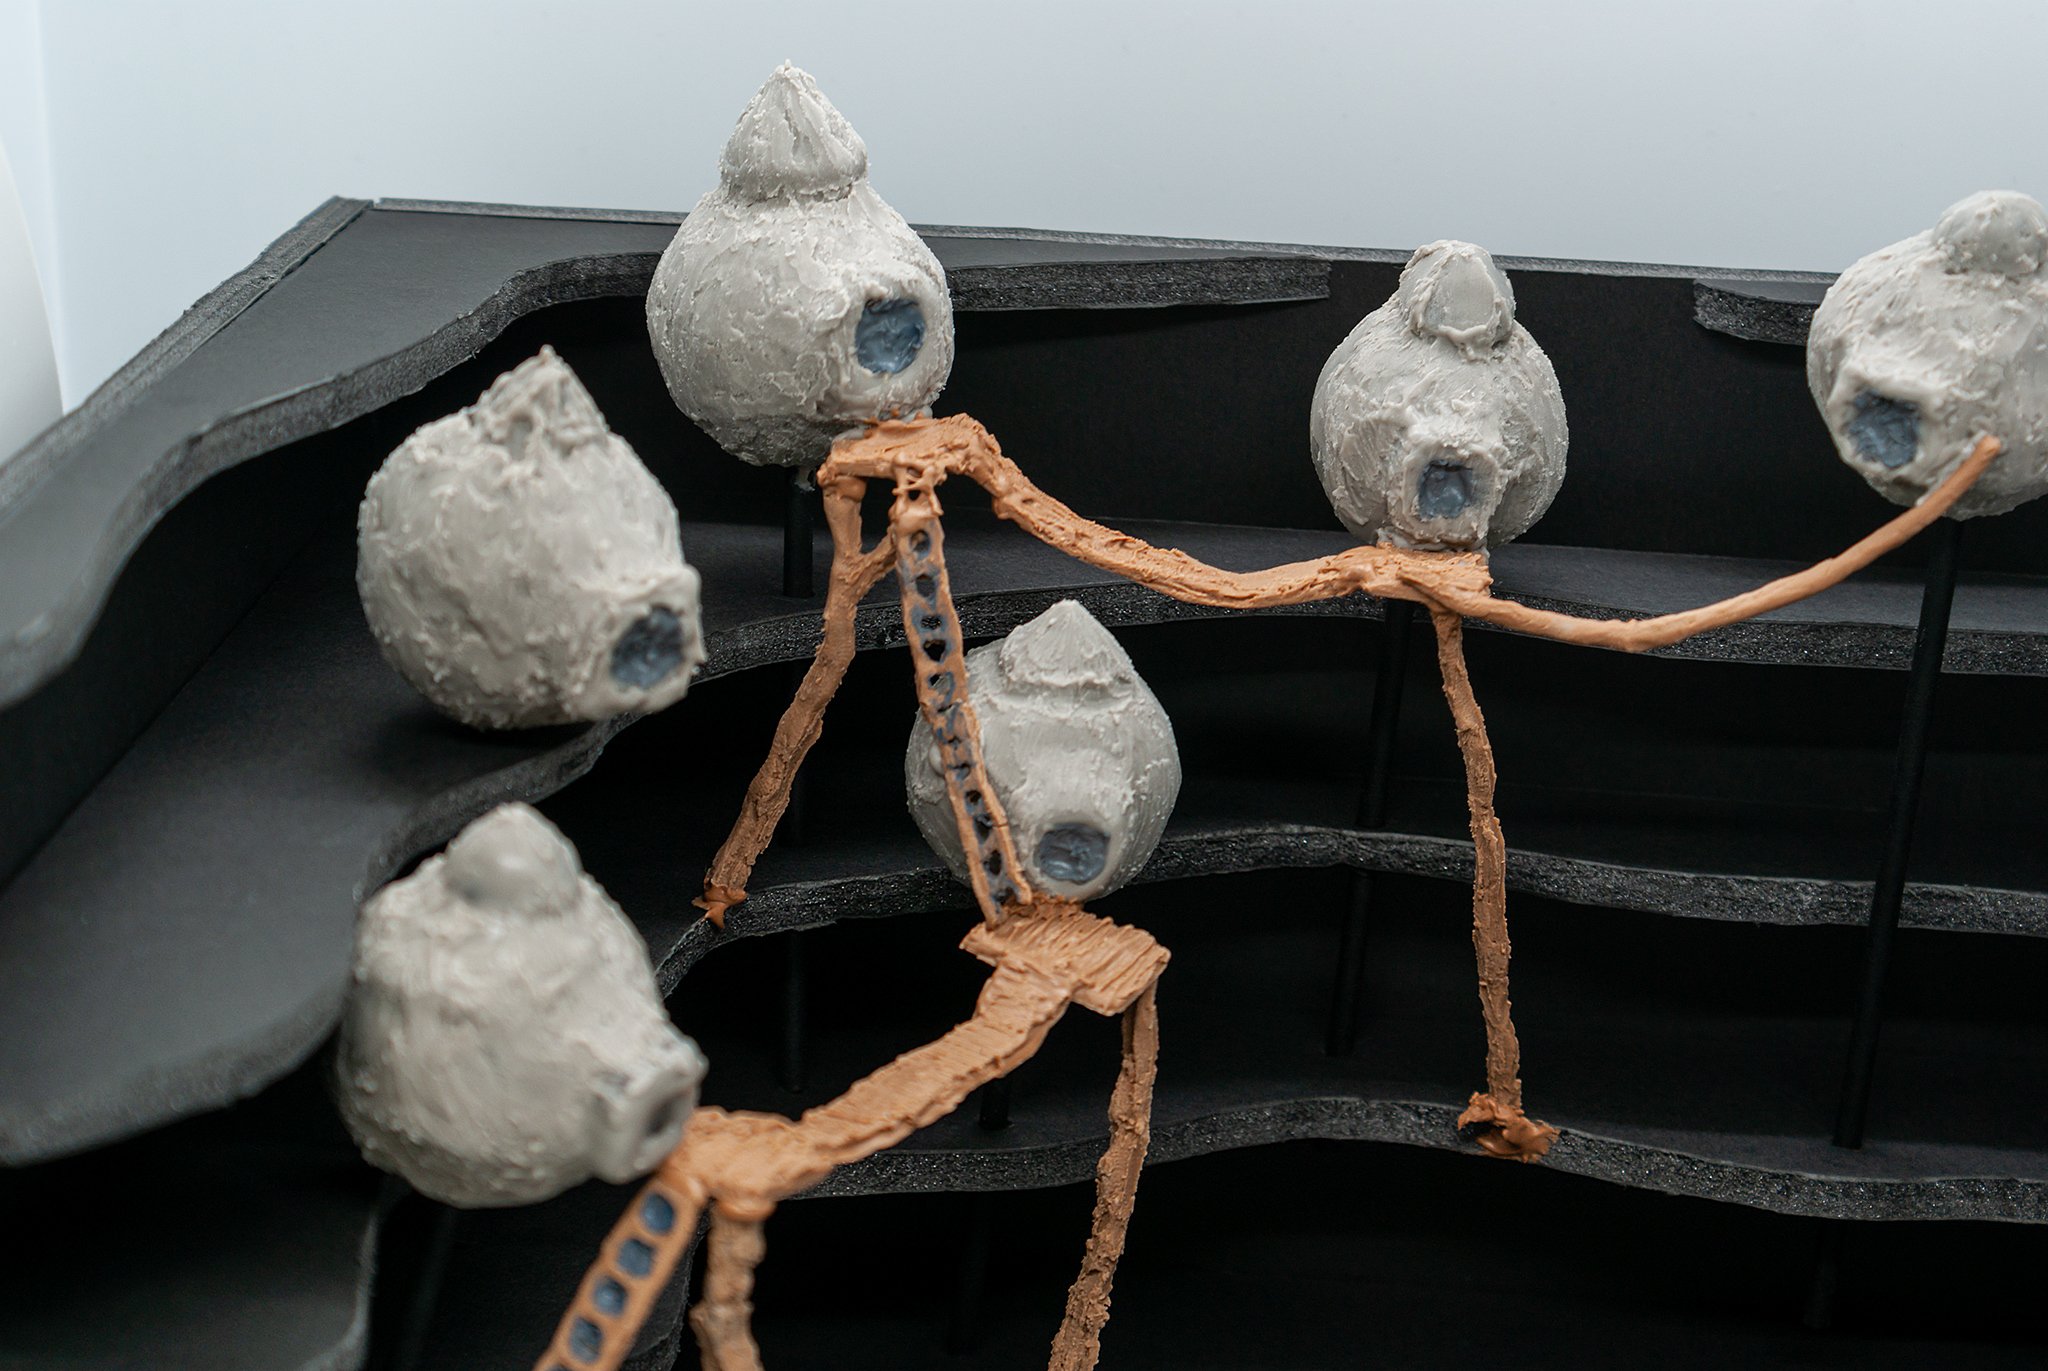
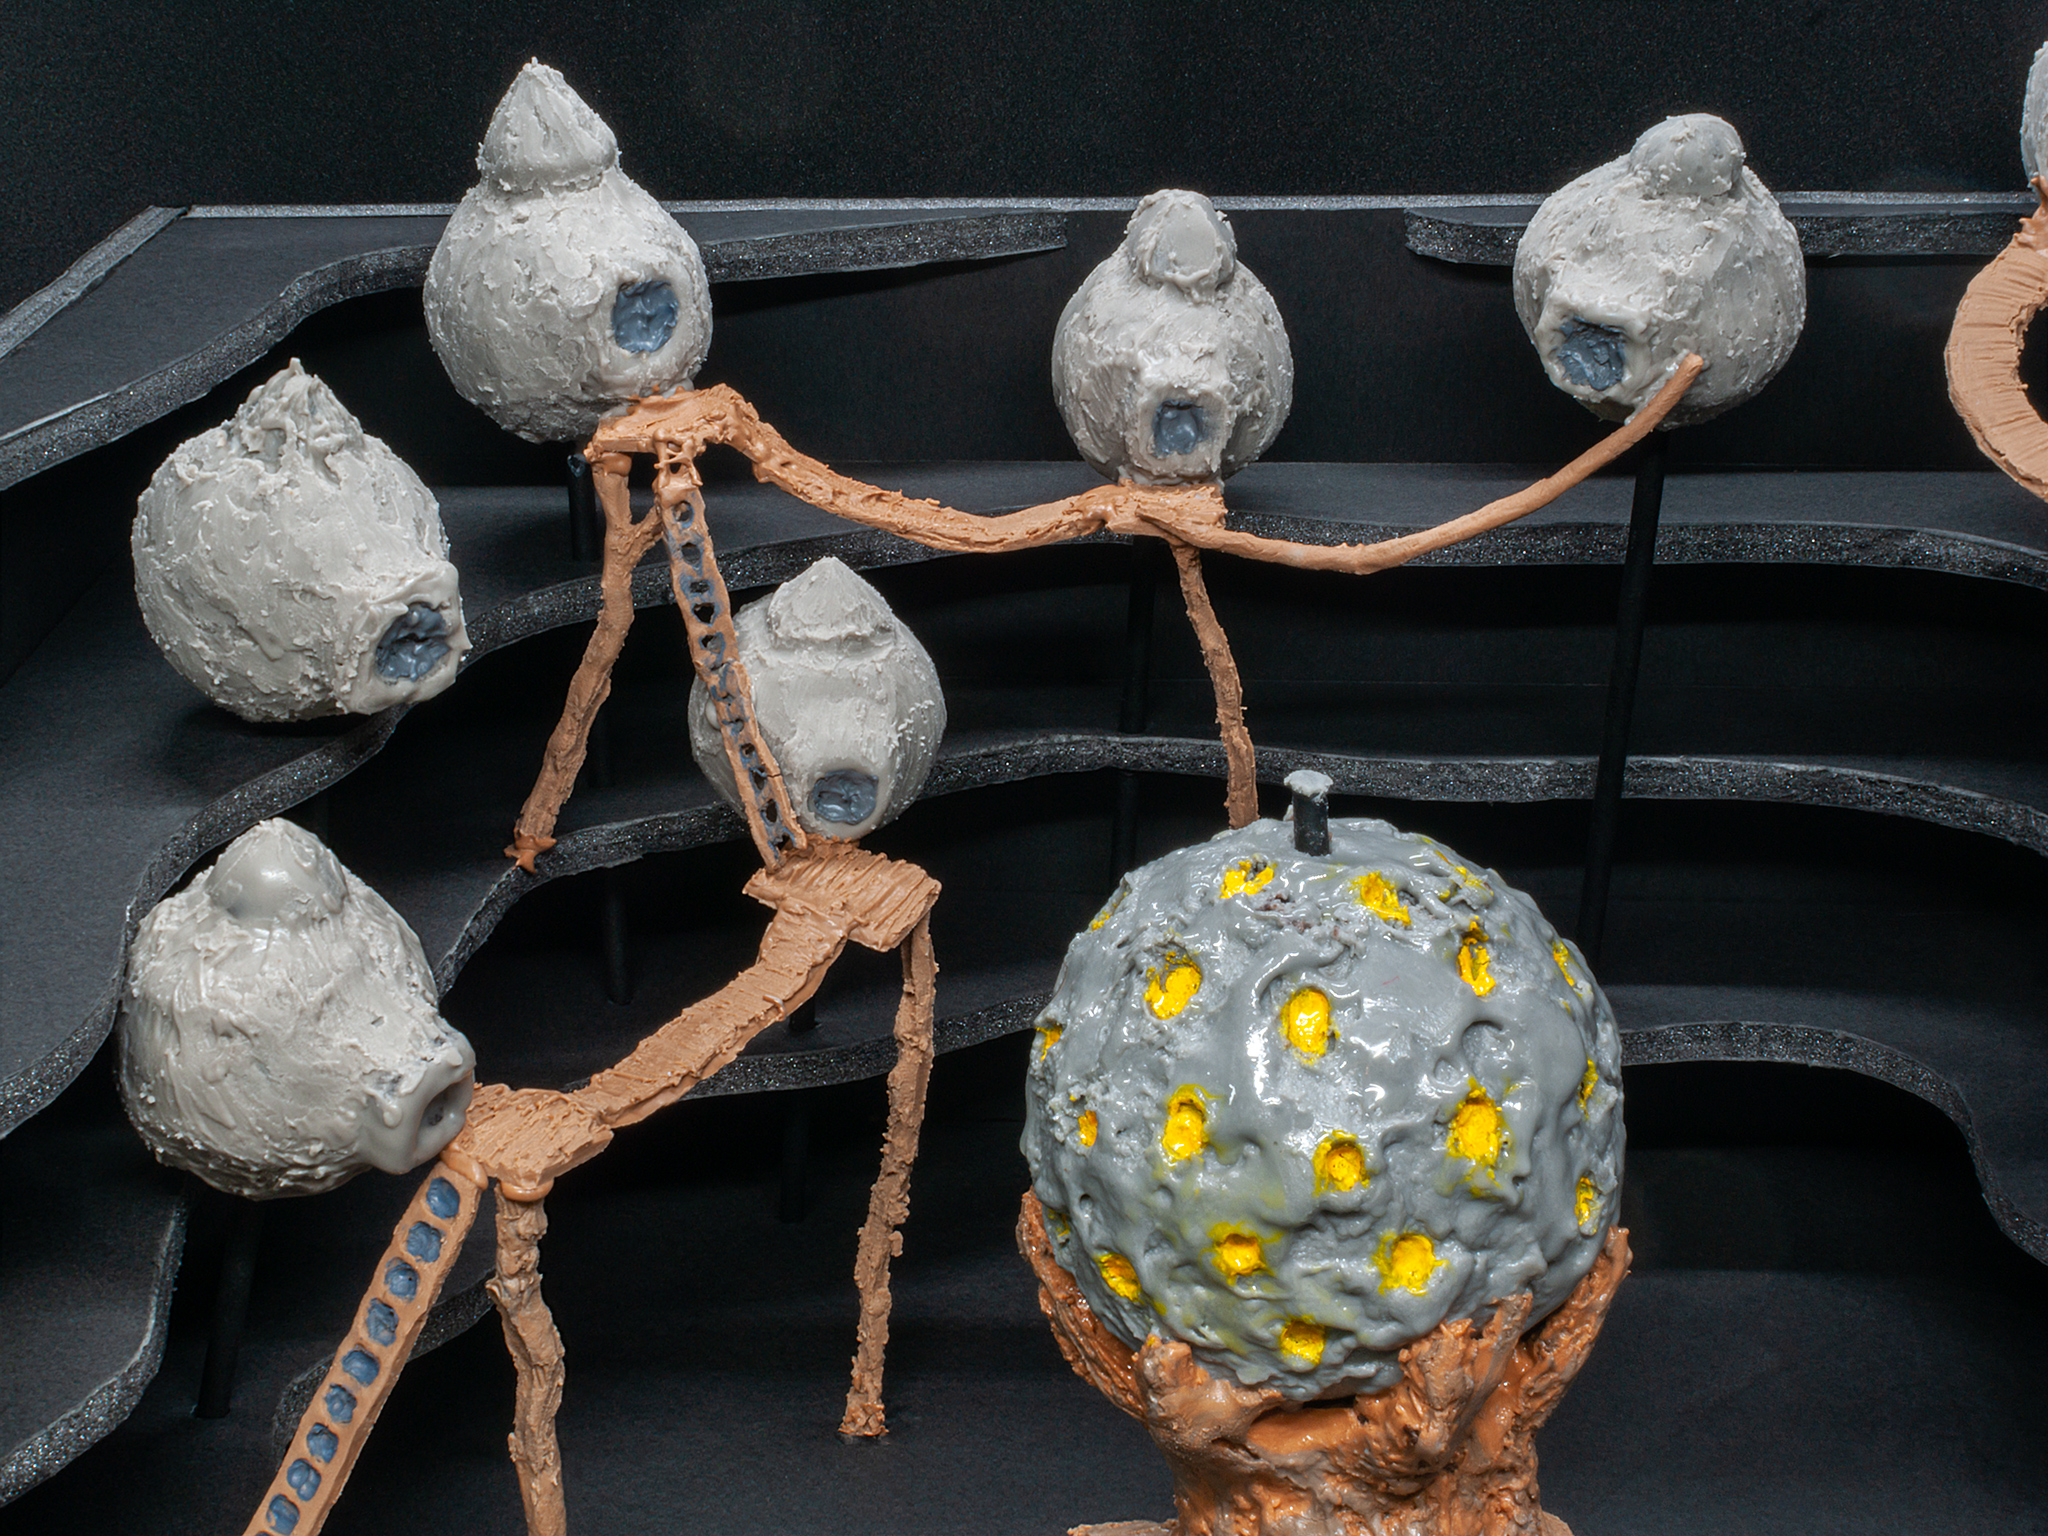
I’m a bit late sharing this on my website, but here’s our entry for the second annual @cyanworlds#CyanCake2 competition! This entry is set 25 years after Riven’s demise. With the rest of the villagers having moved in, Tay’s hive became full, so they built additional huts along the cliffs…
…Or I’ve come up with a convenient narrative excuse for making Riven Village/Tay Cake Pops! 😉
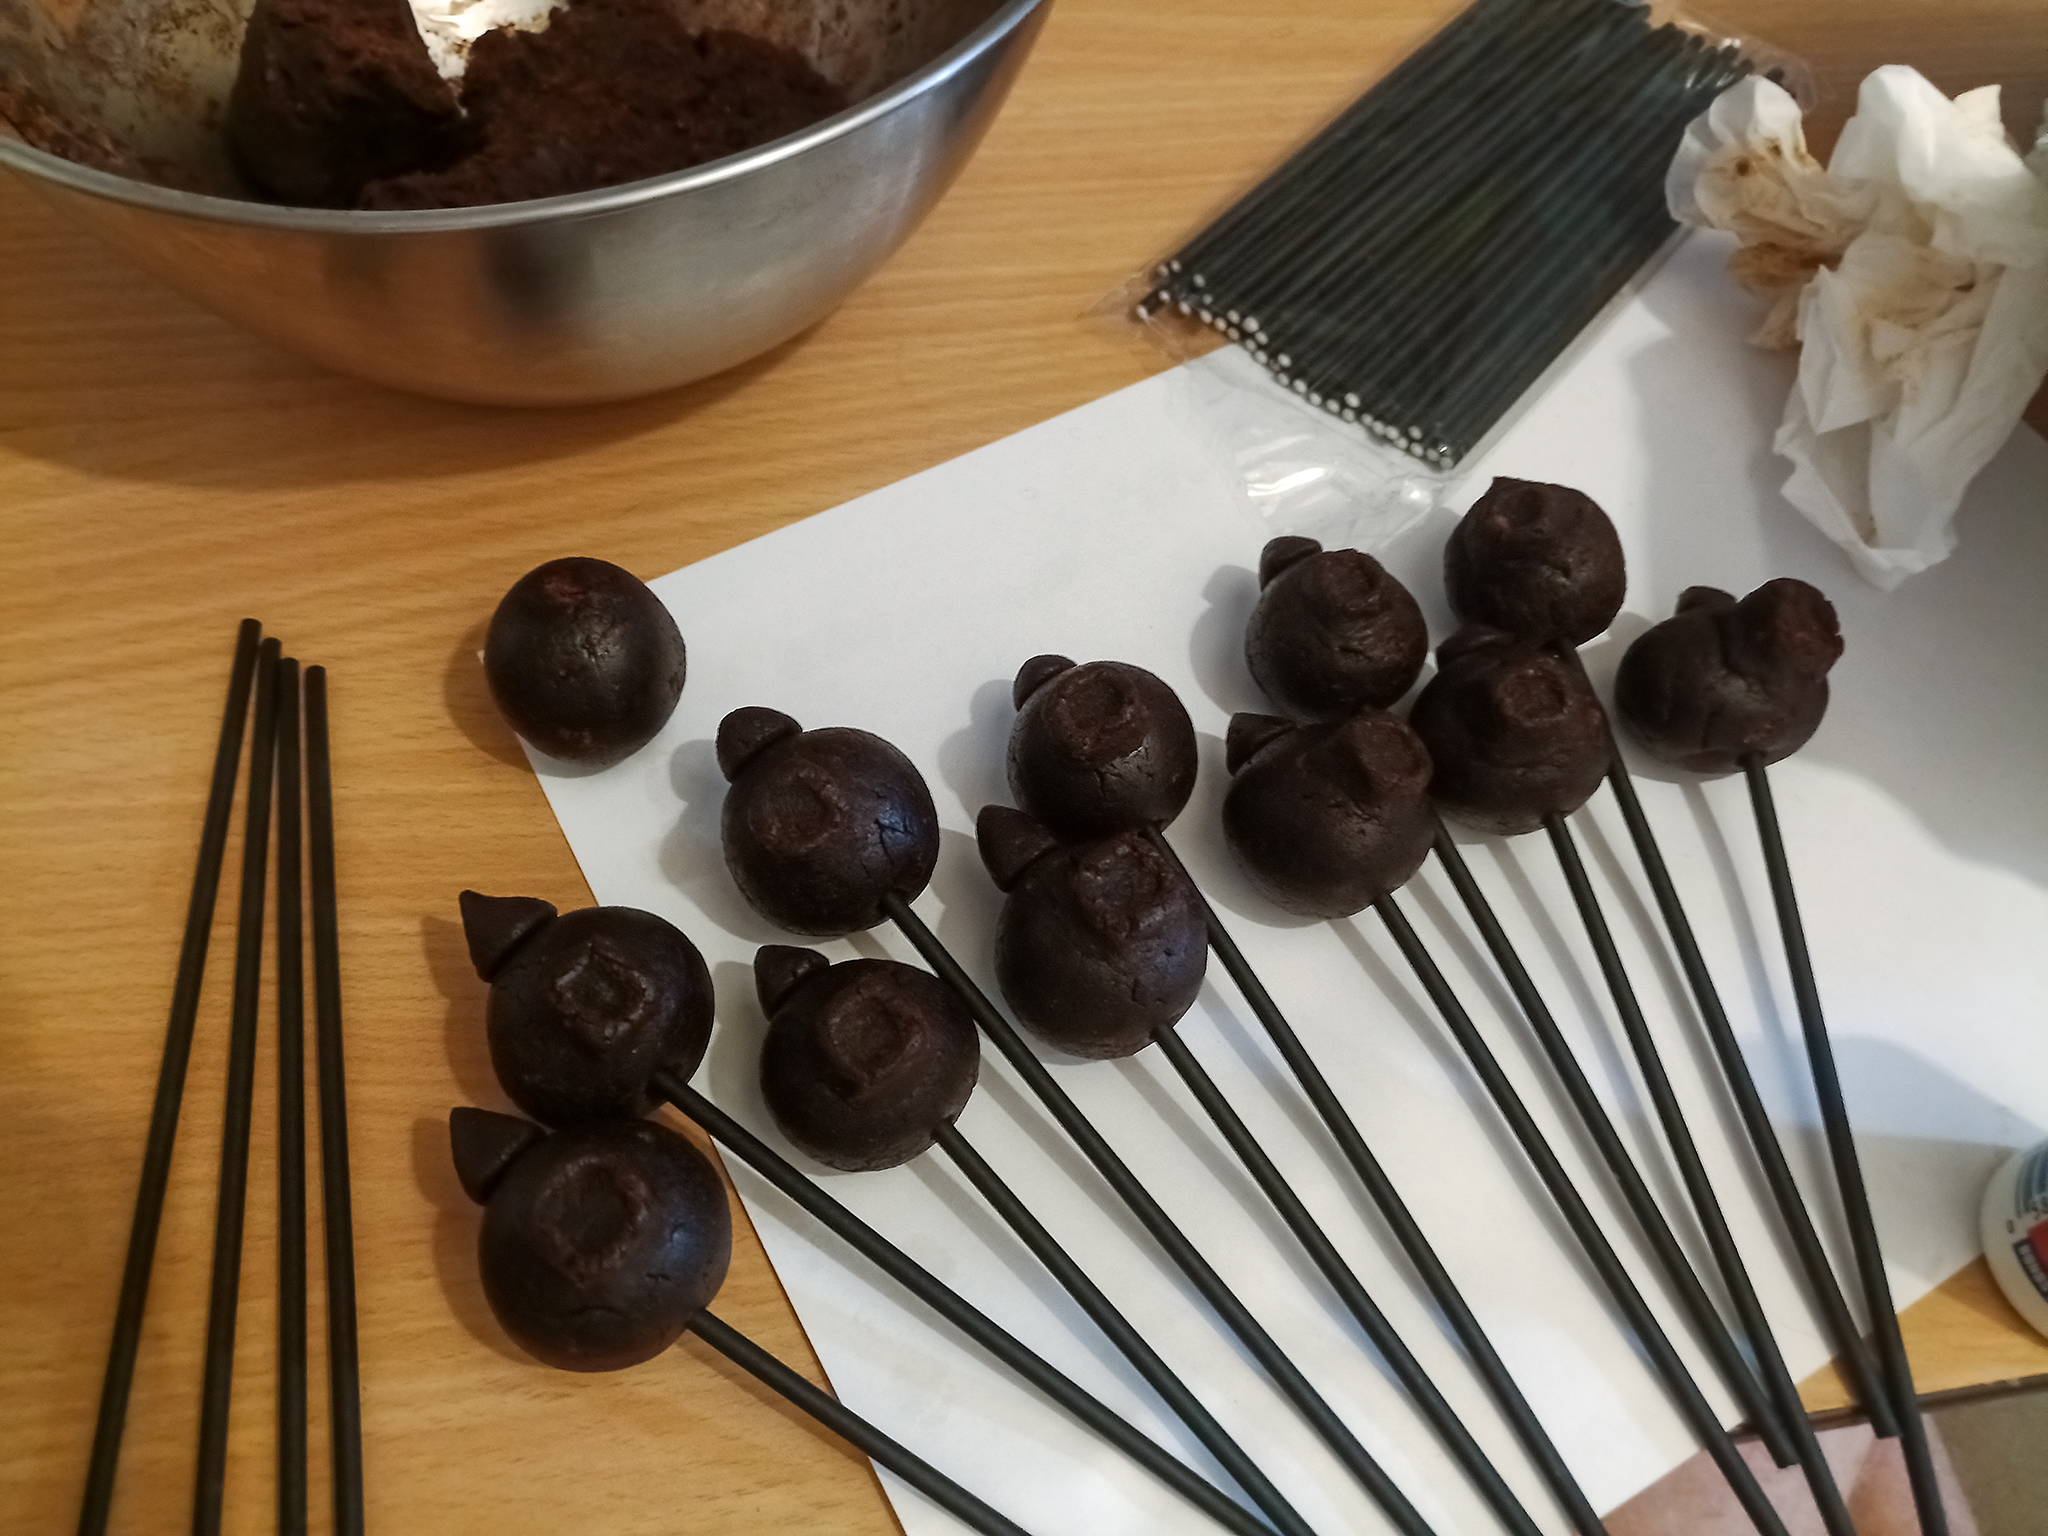
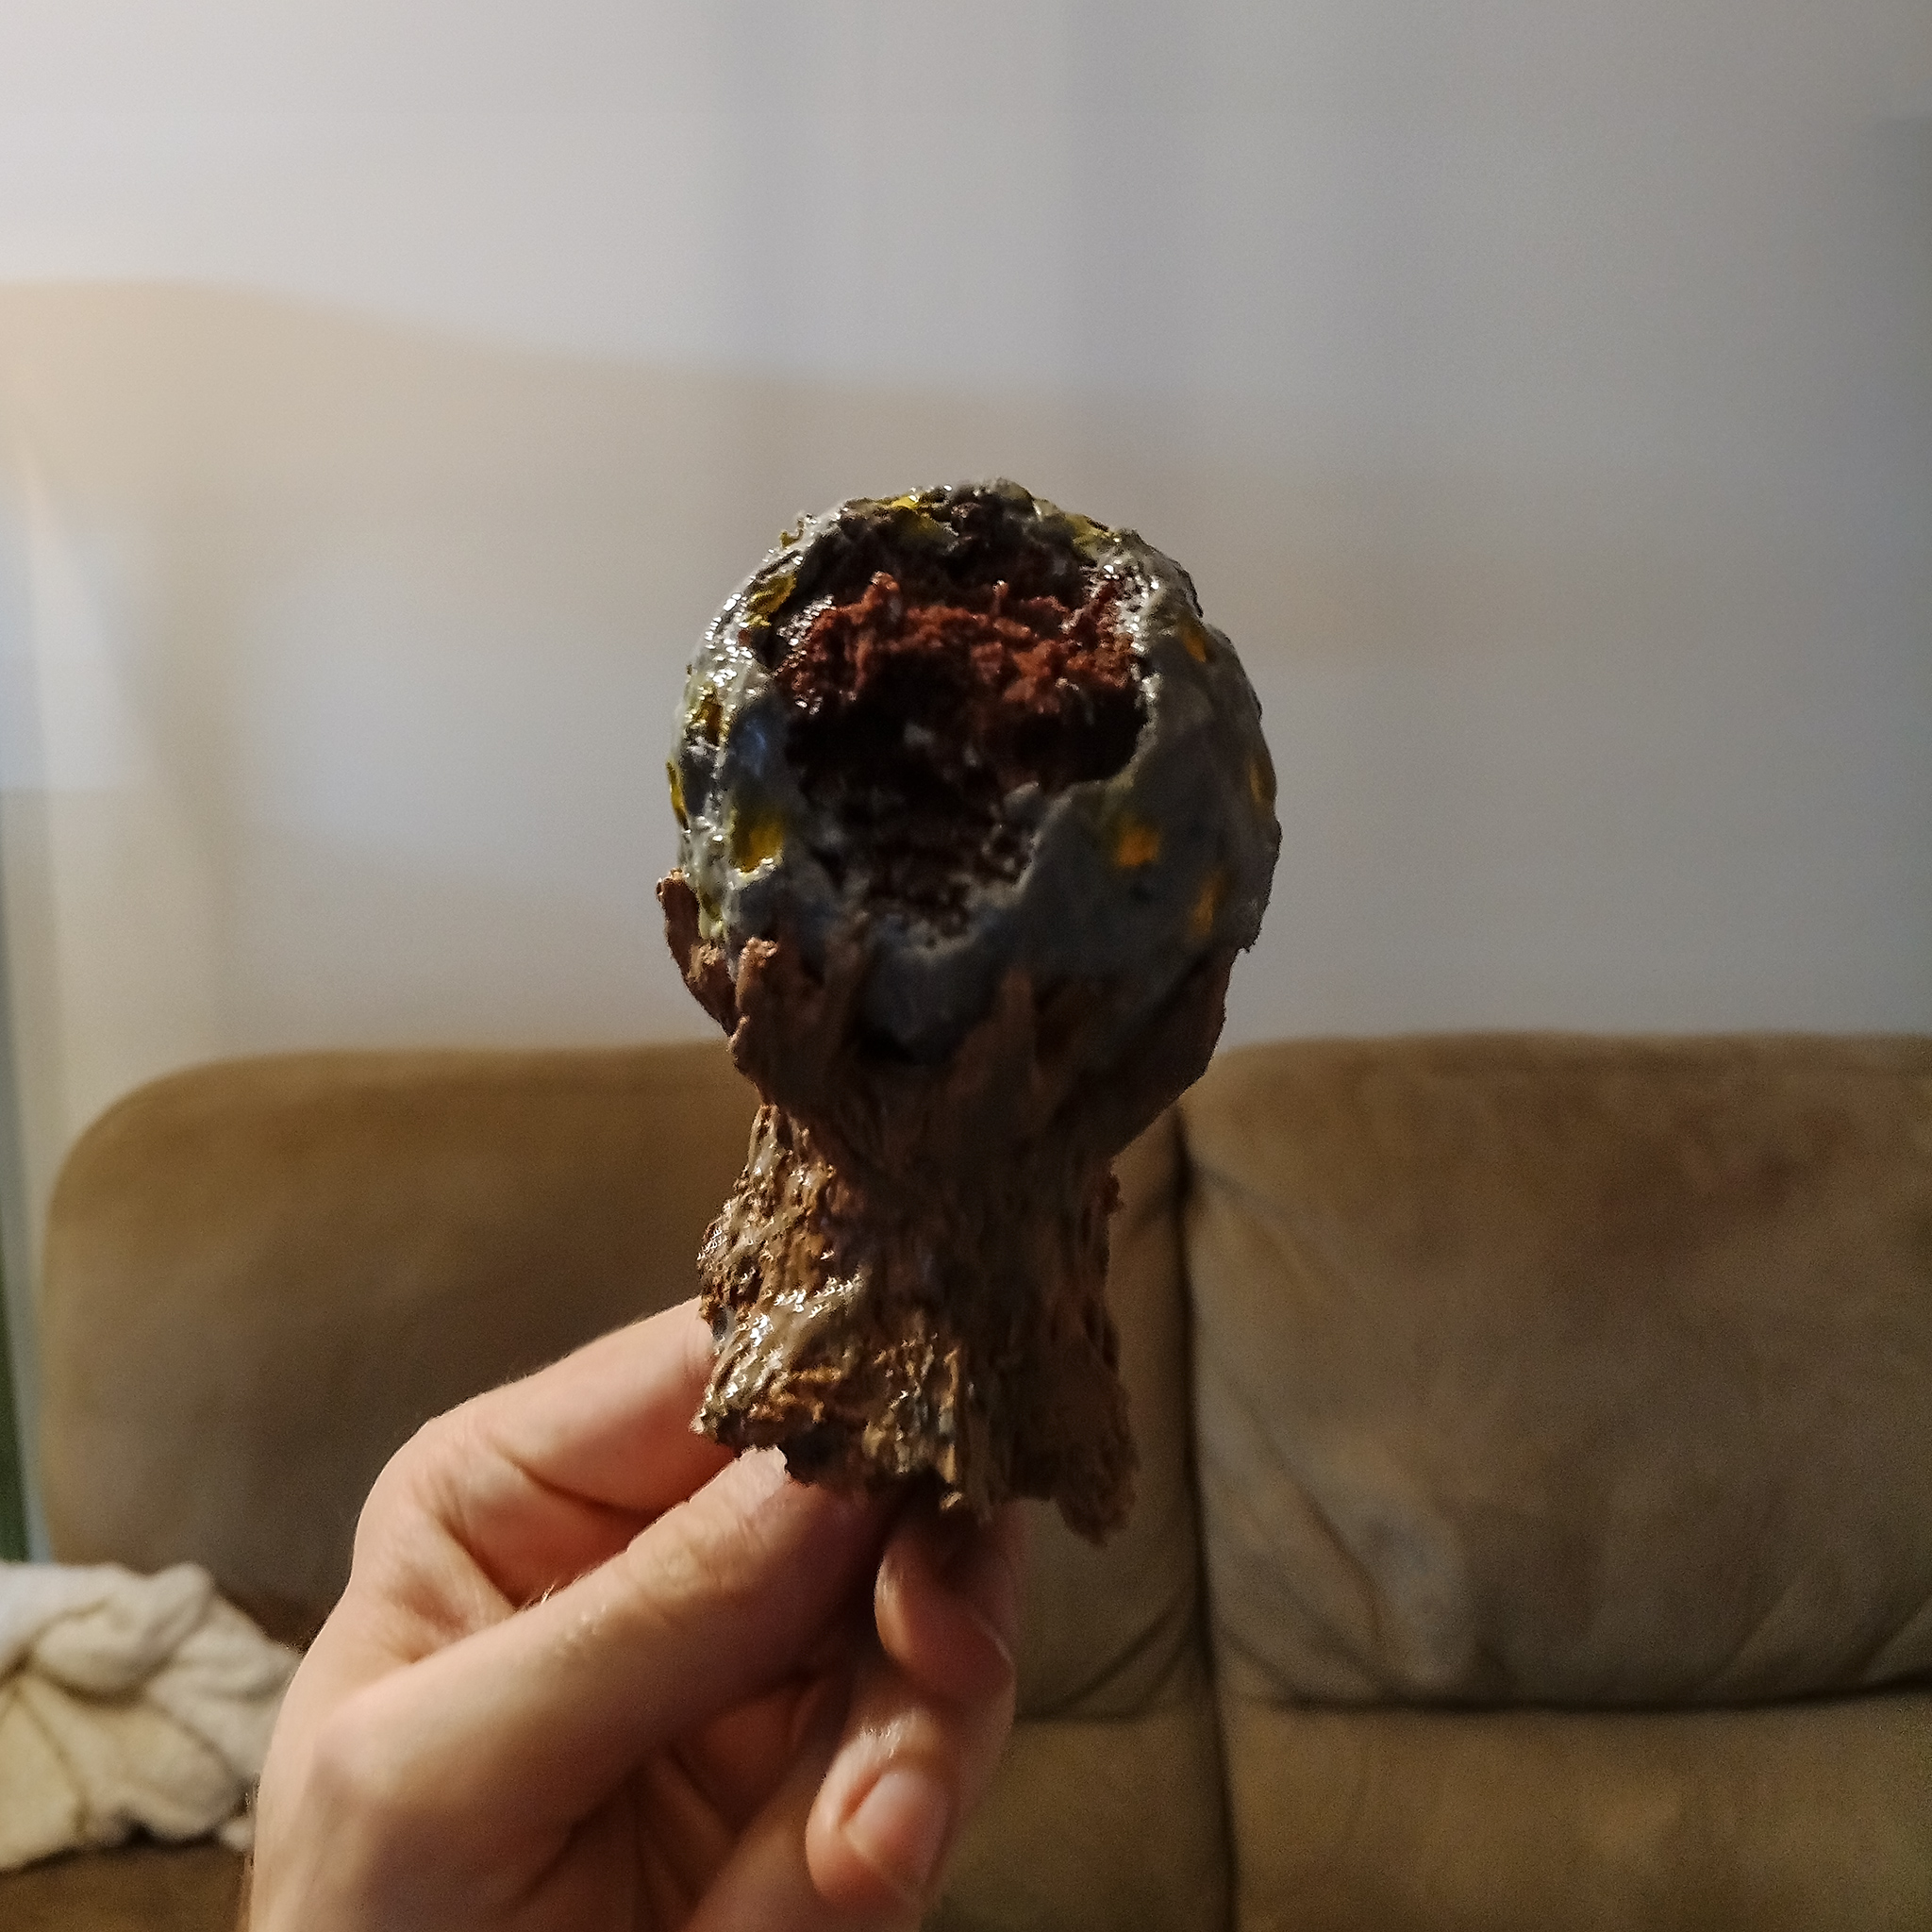
The cakes are dark chocolate, tequila & chilli flavoured, as that seemed like a very Riven-esque combination to us. The outsides are all coloured white chocolate. Everything except the cake pop sticks and the stand is 100% edible with no armature wire or other supports used.
@made_meka and I first tried Tay itself, but melting the chocolate to make the window depressions didn’t work very well at scale, so we pivoted to villager huts.
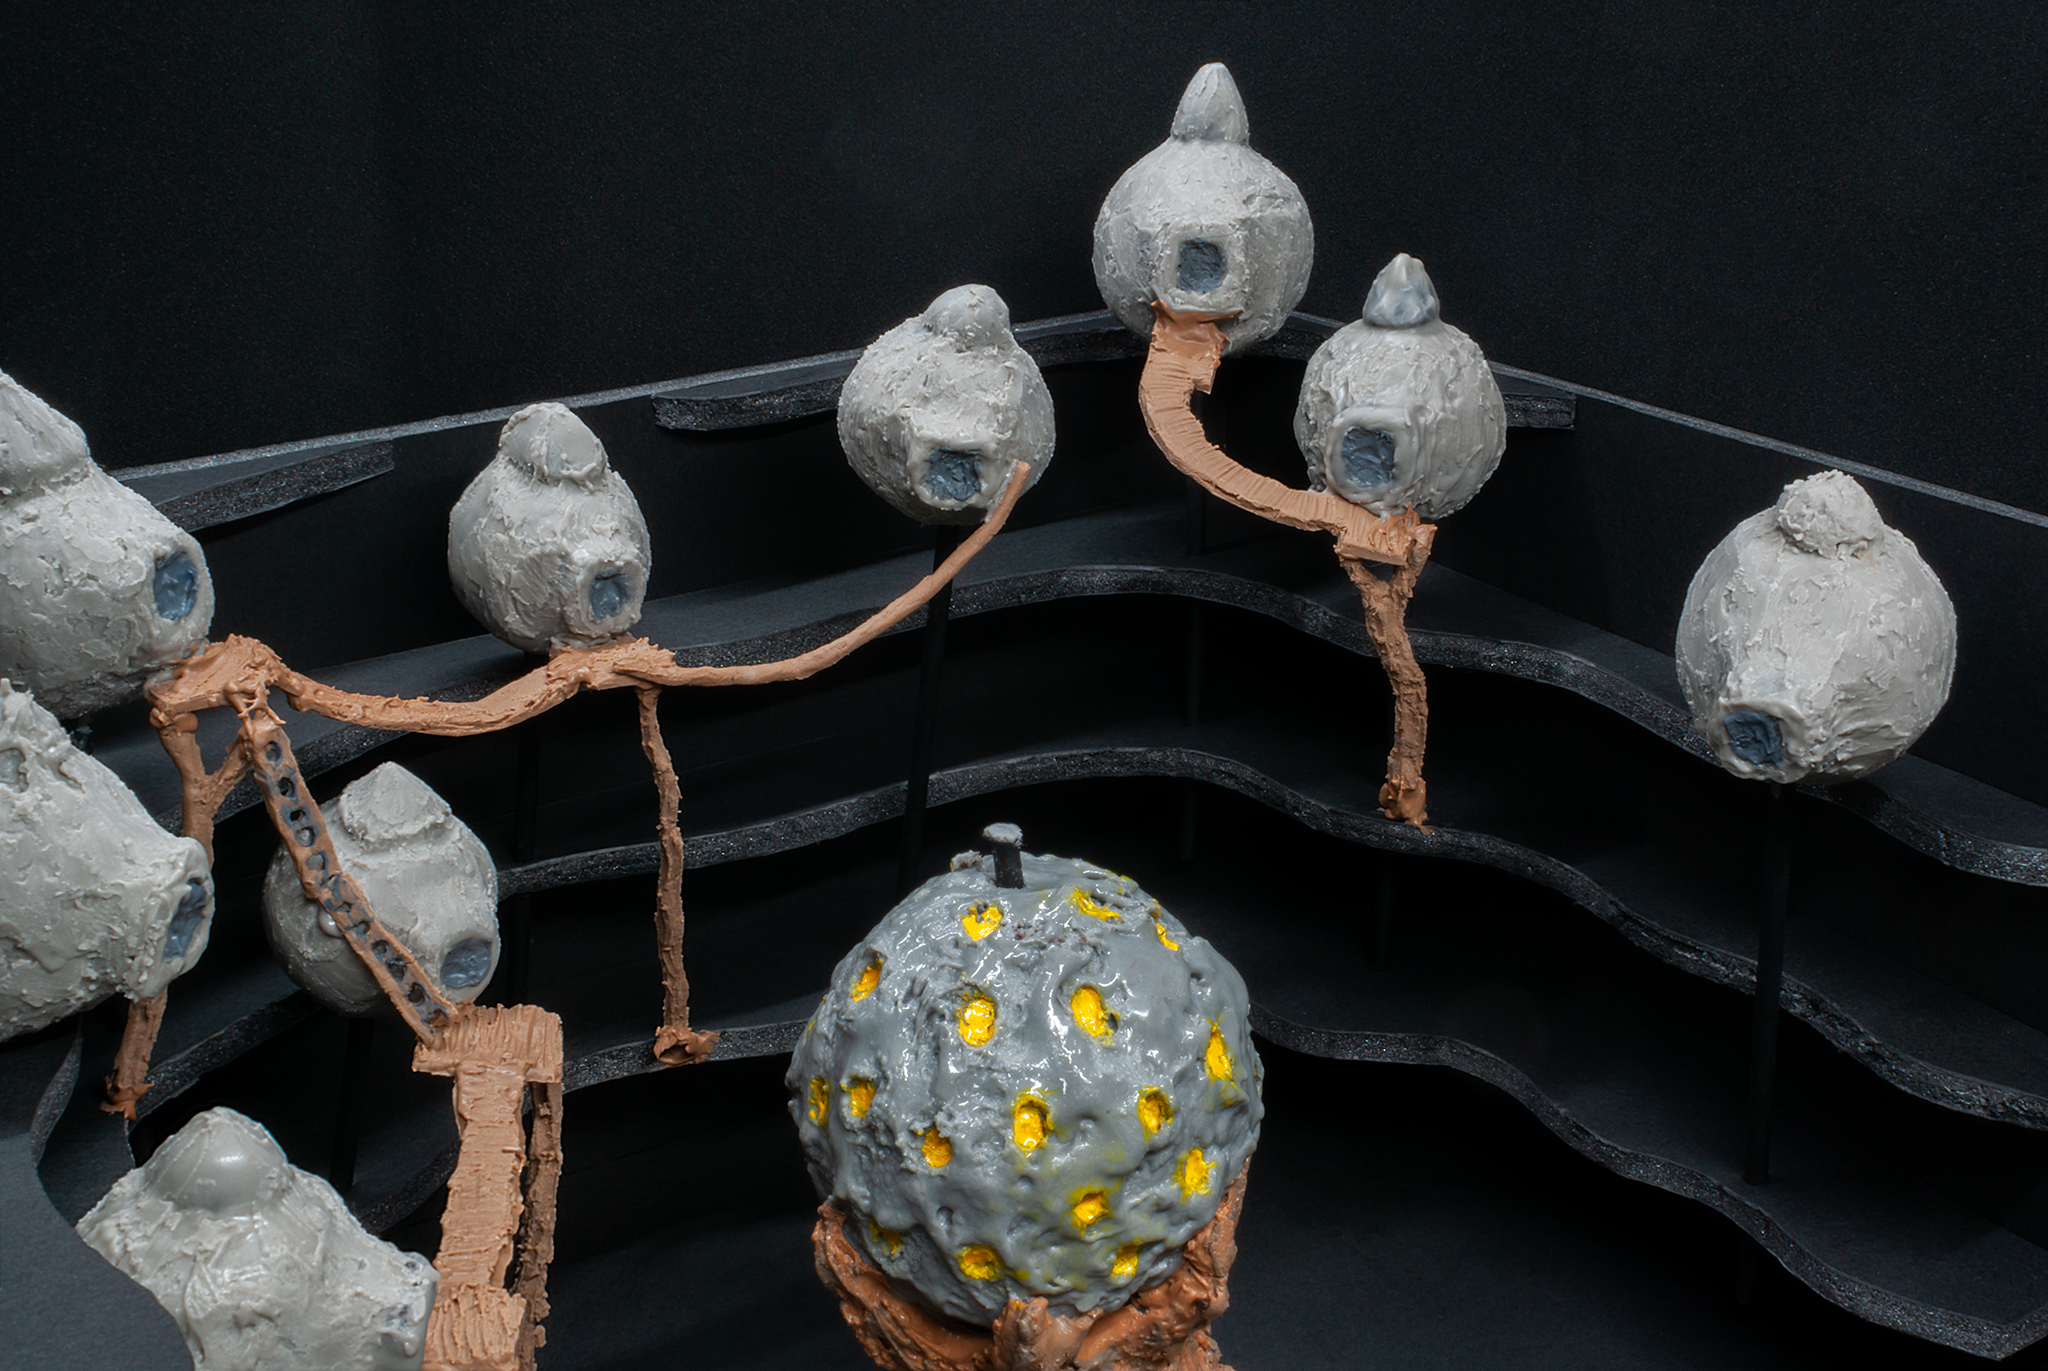
There are NO supports/wires in any of the bridges/ladders/etc; those are 100% chocolate! Each piece was made individually, then “glued” together with liquid chocolate in an air-conditioned, humidity-controlled room.
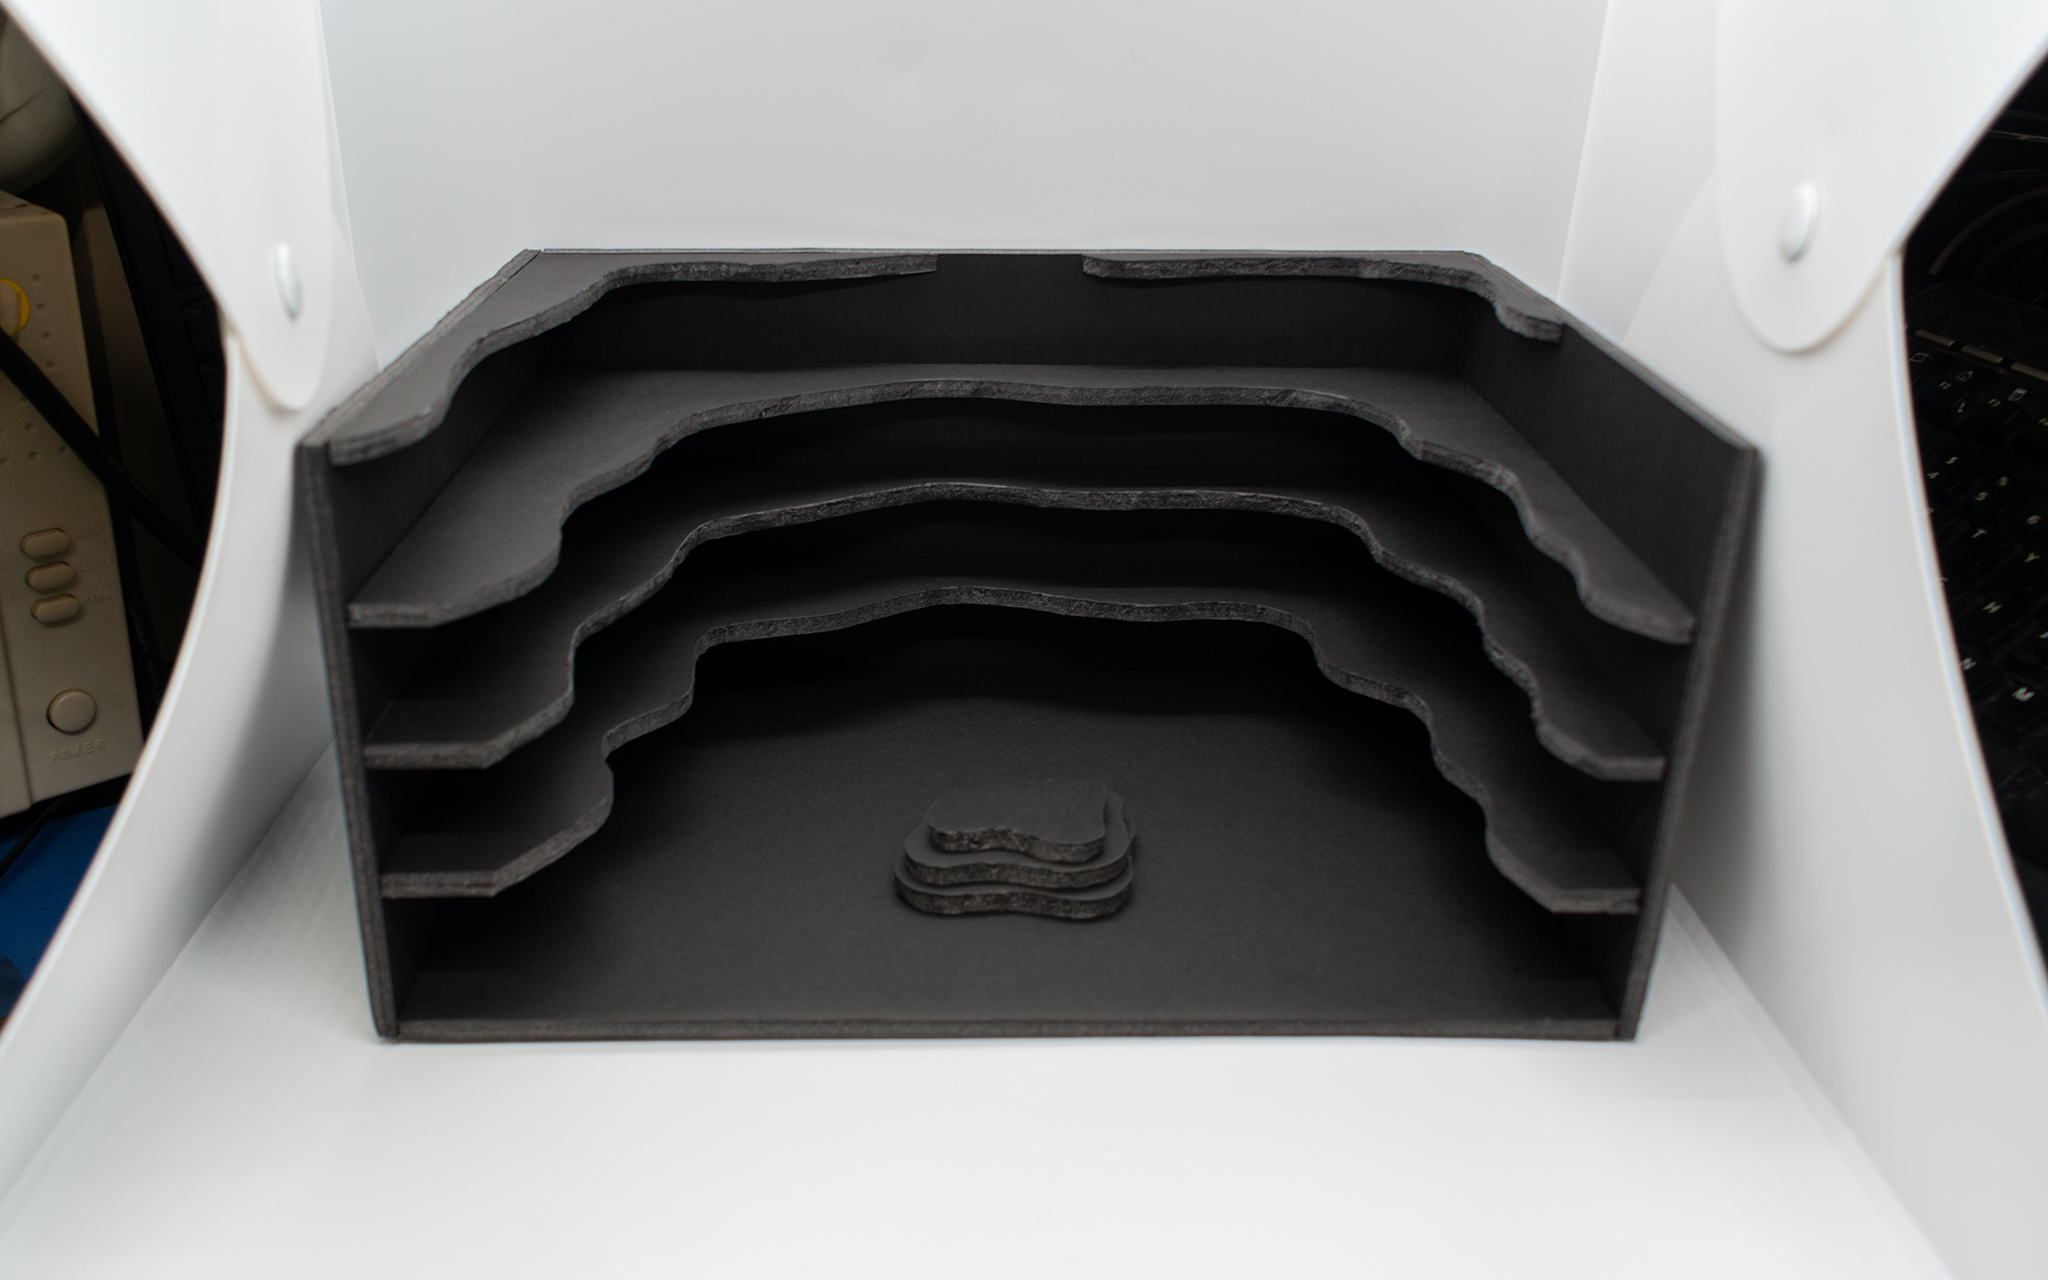
Cake pops need a stand to hold them up, so we built Tay’s cliffs. They were made from 5mm foam board, traced freehand while watching the flyby video.
A super big thanks again to @made_meka for their help with this!
Now it’s time for me to pop some Rivenese cake pops!
The following is a guest post by Mike’s partner and past HSBNE inc executive member Meka, and is written as a follow-up to the previous post on this matter. This post has been reviewed by many others – current and past HSBNE members, multiple past HSBNE executives, and those who have no relationship with HSBNE – who all have seen the underlying evidence behind what follows and consider it to be true and accurate.
A toxic environment at HSBNE
First, I want to stress that Mike’s objective from the start of all this trouble was the protection of vulnerable people within HSBNE. Having been a very involved member for 8 years, he felt a responsibility for its members and assumed he carried a reasonable amount of respect there through his regular volunteering, assistance with fundraisers and long-term membership. Through our social networks, Mike and I ended up hearing from many dissatisfied and upset former members and guests who encountered cultural issues at HSBNE. That feedback helped both of us realise we were part of an organisation which enabled a culture of microaggressions, misogyny, and excusing unacceptable behaviour, and we were not content with that. However, when Mike tried to address the executive with concerns, he met a shocking level of resistance to every attempt at long-term institutional change. This post comes a long time after many of those incidents, and the reason for that is because the conciliation process through the Australian Human Rights Commission (AHRC) has only just recently finished, and it was not appropriate to publicly discuss these issues until all avenues for an amicable resolution had been explored. I’ll say more on that in a bit, but suffice it to say, HSBNE and Mike were unable to come to an agreement.
Therefore, the primary audience for this post is current or future HSBNE members/supporters who wish to be part of an inclusive and safe club, and more importantly, vulnerable people still considering attending HSBNE. And there is a second motivation for making this post. We’re hoping for some healing closure for Mike and me.
Mike has been in a state of crisis since the events that happened at HSBNE in 2020, which has had a devastating effect not only on his life, but on the lives of those who love him, including myself. As a result of prolonged abuse and becoming a target of aggression from his colleagues, he developed complex Post-Traumatic Stress Disorder (cPTSD), a serious condition causing physically and emotionally painful flashback attacks. cPTSD is a daily struggle, and having been his partner for almost 10 years, I can assert that the bullying and silencing by members in authority at HSBNE is the direct cause, as can his doctors who diagnosed the cPTSD and who have the continuity of care with him to be able to ascertain this. While they could not have predicted this specific effect on him, the members involved with the incidents were well aware that he is a vulnerable person, and I believe the behaviour he was subjected to goes well beyond the threshold anyone would tolerate.
I try to be compassionate when assessing these situations. I know most people are not terrible at heart, so I want to believe that the people involved in covering-up the abuses Mike experienced, spreading rumours about his mental health, blocking his ability to speak on his own behalf, and escalating the situation, did so out of ignorance or a misguided reaction to a dilemma. Yet actions have consequences, and even after finding out how damaging their actions had been to Mike, those people continued to cause harm. I was left with the question of whether their choices were being made in the best interests of the members or simply the well-being of the club as an entity, and whether these were conscious choices. Through much of the time I was a devoted member of the club, I dealt with my own cognitive dissonance about the culture there with excuses about lack of time, the belief that I was making small differences, and that my presence was a net benefit.
By the time I realised I had been deceiving myself, I had already seen the negative effects on my own behaviour that being deeply involved with a toxic social group had fostered, and I carry guilt over my role in enabling and expanding the reach of that group. My values demand that kindness and justice must come above personal gain or convenience, and reflecting on them revealed that HSBNE could not be saved for me. Ingrained cultural issues, the involvement of a small number of toxic individuals who had infected the group like a cancer, and the exodus of good people who were quicker to this realisation than me, were all clear indicators that I needed to leave. No matter how mentally strong a person is, the continued draining of emotional energy into an unwilling recipient is a fast track to burnout.
HSBNE’s actions have had lasting consequences for vulnerable members
Mike had more difficulty with the idea of just walking away, though. He feared that some of the more serious issues would continue to be perpetrated. As we had no small part in refining the club, he felt a responsibility to stay and swim against the tide to enforce some minimum acceptable boundaries. He settled on simply making sure Australian law was followed, particularly considering the reports we’d heard from some people regarding sexual misconduct and non-consensual touching. Unfortunately, taking these things to the police is hard in the most clear-cut circumstances. Add in the culture of protecting the club above all else, and the possible hostile witnesses that may produce, and you have a recipe for traumatised victims and no justice. It’s also near-impossible to fight someone else’s battles if they themselves do not have the willingness or ability to take on that fight, so that often leads to people with a strong sense of justice feeling overwhelmed with the weight of inequity and pain this leaves behind. Mike, therefore, decided he would focus on smaller battles, such as petty theft and destruction of member-donated & member-loaned property that he had experienced regularly over the years – easier to prove and of much less risk to the group’s reputation. Start small and build up.
As many know, group dynamics like this make disrupting the status quo a fairly risky move, but neither of us expected the extent to which some members would go to protect the establishment, nor how conditioned the inner circle members were to protect the group from all dissent without question. It was shocking, to say the least, to see people I regarded as friends suddenly turn on Mike, twisting facts beyond recognition or totally rewriting events in order to diminish the issues he brought to them. It was so fluid, so easy the way the truth reshaped into half-truths and then complete fiction in so little time, it has made me wonder about the club disagreements I weighed in on during my 7-year stint. How much did my rose-tinted glasses obscure my perspective, and was it “groupthink” or was there a pilot at the helm? The sudden and unexpected transition from in-group to out-group was eye-opening and revealed the situation was far worse than I had even begun to unravel. Again, I don’t believe most members of HSBNE have ill will towards others, nor do I think most were particularly cognisant of the specifics of their actions. Rather, we had a social structure that was ripe for exploitation by bad actors, and many members who were caught up in the pull of group dynamics. There were certainly those who tried to fight the tide, but they were always fighting a losing battle and I watched many paddle themselves to the end of their tether. All I can say to anyone I may have hurt due to my behaviour, decisions or passive approval of others’ actions, is that I’m sincerely sorry, and I hope that my late but eventual realisation of my role in your pain is enough to earn forgiveness.
I have walked away, and wise folk would tell me to forget about HSBNE and use this time to develop into the person I want to be. I work at looking after myself and developing as a person, yet I’m unable to forget. The cPTSD Mike suffers from affects us daily, and doesn’t let me clear HSBNE out of my life. I can only imagine what it’s like being him, stuck in that place, reliving betrayal from your best friend, finding out a number of people you trusted are conspiring to eject you from your main social group, clearly remembering every detail of the situation, but with no opportunity to defend your reputation amidst a torrent of ever more fanciful lies.
I gained some inkling of the pain Mike lives with when I had a brief experience of insomnia-induced mania after a surgery, and the filters that normally calm our unwelcome, intrusive thoughts and memories temporarily stopped working for me. With ADHD, I usually have trouble slowing down my mind, but this experience was particularly horrible and I couldn’t ignore it. cPTSD seems to be like this, giving painful memories amplification without context, no alternative to raw emotion except to distract it as best we can. Every day I regret not somehow convincing Mike to walk away from the group earlier, before he had to live through the social rejection and aggressions that now run on random repeat in his brain. Before an influential group of his peers solidified fears instilled by a life filled with bullying, abuse and betrayals. The disappointment I feel over the behaviour of people I once considered friends has been the hardest emotion for me to deal with.
Illegal discrimination is acceptable at HSBNE
For brevity’s sake I am only going to present evidence for one instance of the discrimination Mike experienced, as it levelled up the seriousness of the entire situation, however you can view more of the story here. I believe this particular example is of great importance to current and future members, as well as any other entities that may interact with HSBNE.
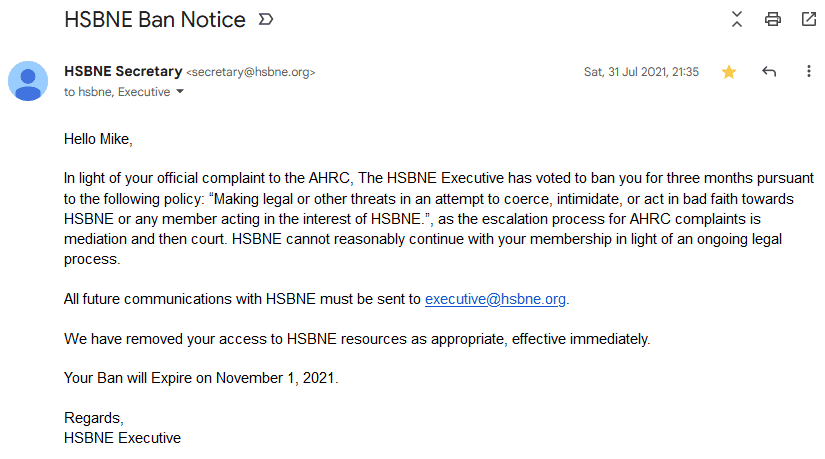
Unable to persuade the executive of the need for any action, and blocked from speaking to other members about it or to even tell others that the mediation service exists if they need it, Mike found himself without recourse but to file a formal complaint with the Australian Human Rights Commission (AHRC). This is an email that Mike received from HSBNE‘s executive within hours of them finding out he had filed the complaint:
Mike was given HSBNE‘s toughest ban for simply submitting a human rights complaint, so apparently, reporting illegal behaviour to external entities can be a punishable act at HSBNE, despite their claim to be a “Safe Space”.
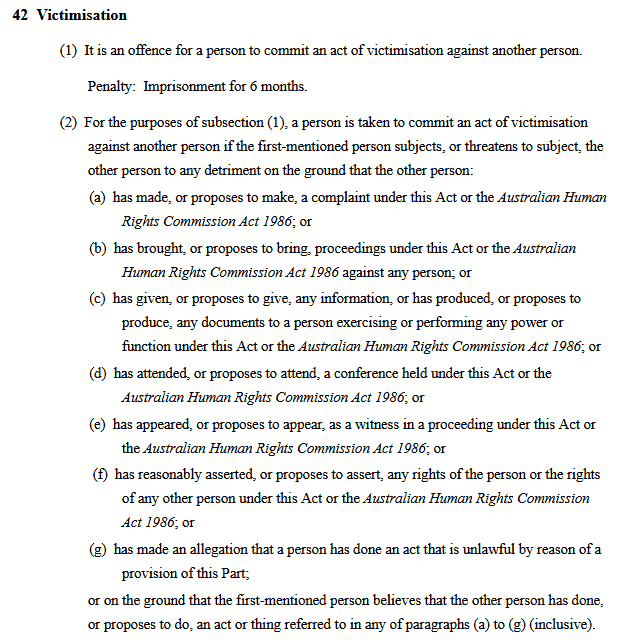
The Disability Discrimination Act (Part 2, Division 4, Section 42) clearly states it’s a criminal offence to punish someone for filing a Complaint, with a penalty of 6 months imprisonment. This also applies to those who incite, promote or threaten the illegal act, so whether or not you agree that all seven pages of Mike’s original AHRC complaint are valid, this unlawful ban by the executive shows a severe lack of judgement on their part.
Victimisation is a serious (and illegal) matter. HSBNE violated the Disability Discrimination Act, and with HSBNE’s rules still as they are, they are primed to repeat that if they so choose. Just having the relevant rule on the books constitutes an illegal threat. As such, I advise avoiding HSBNE if you are someone who feels you are at risk of discrimination due to your race, gender identity, sexual preference, disability, neuro-diversity, age, religion, or other protected class. My experience alongside Mike has shown that discrimination is not only accepted at HSBNE, but standing up for one’s own human rights is viewed as an unforgivable offence.
HSBNE is not a Safe Space
Due to conciliation dragging on so long, multiple executives were involved in the AHRC complaint, and no agreement could be reached with any of them, which leads me to believe they are all content for discrimination and issues of other kinds of safety to go unaddressed and to perpetuate that culture in the organisation. I say this as someone who served on the executive at one point, and I take the responsibility of serving on the committee of any not-for-profit very seriously. I believe individuals on the executive/committee/board of an organisation have a duty of care to maintain a safe and functional organisation, and if they lack the required skills or knowledge to do so and no other capable members are able to step up to take that role, then the only ethical option is to pause operations and divert efforts and funding to fulfil these minimum requirements. It is regrettable and unfortunate, but if volunteers cannot maintain the minimum standards, the remaining option is to scale back operations or close, not to cut corners and risk the safety and well-being of others. Therefore, HSBNE calling itself a “Safe Space” and giving itself labels like LGBTQ-friendly is, in my opinion, dangerously misleading. As demonstrated in Mike’s case, it has failed to meet the bare minimum required by law, let alone having the extra management, training and cultural awareness needed to create a Safe Space.
After conciliation concluded without success, Mike had to decide if he was going to proceed to the federal court with his complaint. Legal counsel advised that this would result in only financial compensation, expected to be in the mid-5 digits based on other similar cases and the clear-cut evidence of victimisation. Not only does Mike not want to see the complete financial destruction of HSBNE, but he also did not want to deprive Brisbane of a potentially valuable community resource due to the bad actions of a few. He simply wished to have his voice heard, for the club rules to be applied fairly to those who violated the Safe Space policy and the law, for harmful policies to be removed, for retractions to be issued about defamatory statements and for restitution over having to fight for years over his mistreatment. These are things money cannot fix, and the toll the whole process was going to take on him and me was likely to be severe.
In the interests of transparency, Mike is sharing the full, unmodified text of his AHRC complaint, which does not cover all the abuse Mike has experienced at HSBNE, only that which relates to his disability. This includes both direct and indirect discrimination, but does not include the additional discrimination that happened after filing the complaint, such as his ban or the further silencing by removing his Google review. The accompanying evidence and additional misc texts have been removed through caution of third-party privacy, however the document and supporting evidence spent nearly a month being reviewed for accuracy and objectivity by both current and past HSBNE members, multiple past HSBNE executives, those who have no relationship to HSBNE, a Justice of the Peace, and two lawyers. It was not filed lightly nor without great thought and consideration.
HSBNE has a problem with sexual misconduct
One issue needs to be made particularly clear: that of sexual misconduct at HSBNE. Mike was sexually assaulted at HSBNE, by someone who was an executive member at the time Mike first opened up about it on his website post. I myself have also been made to feel uncomfortable from non consensual touching by that same person, and another past executive member who has reviewed this post was also sexually harassed by that same person. Since Mike’s previous post, a decent number of other past members have contacted Mike, saying they had also been victims of sexual misconduct at HSBNE. One name keeps coming up again and again as the perpetrator for over half of the issues, but let me stress that while those who have reviewed this post agree that this individual is clearly an issue, this individual is not the only perpetrator. Banning that one person will not fix the structural and systemic issues of silencing, disbelieving and bullying those who report issues, and I have seen members openly expressing that they value HSBNE’s reputation more than preventing criminal acts within their organisation.
HSBNE silences victims
Mike opened up about his experience due to concern for others and to demonstrate the pattern of concerning behaviours within the club. He had been very clearly told he was not permitted to discuss anything that would shine a negative light on the club or challenge the status quo if he wanted his forum post approved on HSBNE’s forum, completely against what their own rules say about supporting member’s freedom of speech and avoiding censorship. With all his suggestions to improve the situation denied, not being permitted to discuss it with other members, all forms of internal communication being screened, denied posting rights and discussion at meetings blocked, Mike had no alternative but to warn members of these disturbing issues publicly on his website.
HSBNE members need to be aware that another victim who independently contacted Mike after reading his website post, has seriously considered leading a class-action lawsuit since finding out they aren’t alone in this experience. For as long as the executive prioritizes public image over safety, and the disgusting attitudes I saw on the HSBNE forums disregarding any claims of sexual assault at HSBNE continue to be voiced without strong opposition, the chance that it will happen again is tragically all too likely. Isolating and silencing victims of sexual abuse is the weapon of the abusers. Should further abuse occur, I hope that this post prevails as the start of support and validation for those who need it. With such a large number of past members willing to say it’s happened to them, any victim of future abuse at HSBNE now has supporters to make sure they don’t feel alone, and they will not need to suffer in silence like those before.
HSBNE members defamed Mike
As they apparently began to tire of Mike’s attempts to correct wrongdoings at the space, multiple HSBNE members in positions of authority made false claims that he had broken rules, or was guilty of unacceptable behaviours that hadn’t happened, which in my opinion stank of high-school clique manipulation tactics. Execs painted themselves as long-suffering heroes, who had been selflessly tolerating an unstable invalid all these years, despite the story being far different when Mike was (mostly) compliant. Some of their rumours about Mike’s mental state spread outside the organisation in a way that has damaged Mike’s income-earning potential, and has caused severe anxiety regarding the unknown knock-on effect it might have had on his reputation. I don’t know if these false stories came about because the author was being intentionally deceptive or if their own cognitive bias influenced them to selectively remember or create details, but I simply wish to encourage you all to approach these situations with compassion and curiosity, to consider the source and evidence, and to be aware of how emotion and bias might affect your willingness to accept or reject a certain person’s account.
Even if we had been able to secure some form of justice for Mike through the AHRC, he is still going to take a long time to heal from the cPTSD, and without resolution, the road is just longer and harder. Being treated with prejudice and contempt and having his name dragged through the mud is something even the most resilient person would have struggled with. Having to fight for two years in the hopes that someone would stand up and take some positive action to right the wrongs he experienced was more than we could take. He’s suffering almost constantly, and I have used up everything I had left to support him through to this point. We have failed to get HSBNE to make changes, so if we can’t make something safe, I feel it’s only ethical that we should warn others about the danger.
We are finished with HSBNE, and this post is our final attempt to minimise the harm we have feared is likely to continue if we don’t challenge the wrongdoing and try to pull back the veil. As a survivor of abuse, I could not stand by while I saw the same dynamics I recognised all too well unfold before me once more, and the danger I know comes from secrecy. It’s now up to HSBNE’s members if they want to actually change the way their organisation functions, otherwise we hope this post serves as a way for others to make an informed choice before interacting with that group. Whichever way it falls, I will try to move forward from whatever wrongs my own involvement may have caused, and to become a better person having learnt from my errors in judgement and behaviour. Others must make their own choices, and decide for themselves who or what they stand for.
– Meka, and all those who have reviewed & stand by this post
3-month update: two different executives, as well as all members, have all done nothing in response to the issues made public about Mike’s abuse. In retaliation for this blog post that Mike didn’t even write, Mike was punished further by being blocked on social media, despite not liking or commenting on anything of theirs for years out of respect for their platform, without any communication of what he has done wrong to warrant further punishment or what rule he broke to justify additional penalisation. More details in the comments section of this post.
What’s that? Today’s Riven: the Sequel to Myst‘s 25th Anniversary? And because the whole game is based around the number 25, that makes it an extra special anniversary?? Time for me to release something extra special then!
Time for me to release a fully restored version of Riven Elementary.
Riven Elementary Restored. Playable once again, after so many years!
Riven Elementary was a basic maths game inspired by the Wahrk counting number toy in the schoolroom in Riven (more information on it at the Guild of Archivists). The player has to work out what the D’ni symbols for the numbers 1-10 are by observing what happens when you play with the toy. Riven Elementary takes this a step further, and the player has to work out not only the D’ni symbols for numbers using the Wahrk toy but also the D’ni symbols for addition/subtraction/multiplication/division based on which questions they get right & wrong. It was originally released on the 26th of August 1998, 10 months after Riven’s original CD release and coinciding with Riven’s DVD release. A contest was also part of the original release of Riven Elementary – you could only submit your details if you won a perfect game, and there were two winners a week earning a free CD copy of Riven.
The game itself was made by Jig Interactive using Macromedia Director and designed to play in-browser using Macromedia Shockwave Player, the precursor to Adobe Shockwave. The original version went offline around 20 years ago, but fragments of it lived on in some mirrors. Before now, if you were dedicated it was possible to re-create most of the game to have a functional-but-not-with-original-graphics version you could get running with an old version of a web browser that still supported plug-ins (like I had it running on my Myst book). But what I’m releasing here is a restored version using not only all the original graphics, but in a form that’s easily playable on modern computers.
Wait, is this canon?
The all-authoritative RAWA has said many times that the mathematical operand symbols in Riven Elementary are officially not canon. But hey, they’re also the only mathematical symbols we’ve got, official/canon or not. So people have been hungry for them anyway.
D’ni Mathematics. As easy as one, two, three fah, bree, sehn!
How did you get this running again?
Huge thanks goes out to @tomysshadow for most of the effort! They managed to track down the old Jig Interactive employee, Gabe Jensen, who originally programmed the game (he’s now a children’s book author; you can check him out at gabejensenbooks.com). He still had the original source files, which filled all the gaps missing from the versions you could recreate from the Internet Archive. @tomysshadow also leveraged their experience dealing with old Shockwave files to create a projector for the ancient game so it could be played on modern Windows systems without needing an old web browser with the Shockwave plugin installed.
What’s the system requirements?
Riven Elementary was originally designed to run on Internet Explorer 4-era of Web Browsers with the Macromedia Shockwave Player plug-in installed. Thankfully the world has since moved on from such dark, rudimentary times. What I’m releasing has been tested & confirmed to run on Windows 10 and Windows 11, and it’ll probably run on earlier releases of Windows too. Sorry MacOS users; Apple’s long-term war against backwards compatibility and Adobe Director’s discontinuation in 2017 mean no easy export to a modern native .app for Shockwave files. Those who know how on MacOS/Linux may have some luck with Crossover, WINE, a virtual machine, or similar emulation/virtualisation environment; if you do, let me know in the comments! Other system requirements like RAM or CPU speed mattered back in the day, but today they’re so low a calculator app may be more demanding so they’re not worth mentioning.
Ok, let me at it!
Just download the zip file, extract everything somewhere, run rivenelem.exe, and you’re away!
Some anti-virus providers may not like this game, likely just because it’s old Shockwave content. I’ve scanned these files thoroughly through the likes of VirusTotal and others, but to make sure nothing’s been tampered with here’s a description of the archive’s contents plus their SHA-1 hashes:
Riven_elementary_restored.zip – the whole archive SHA-1 hash: 0d026a3632e2e41e7235372a5822e585cd6edc36
rivenelem.exe – the Projector to play the game. This is what you want to run SHA-1 hash: 19bbe067c7ef3eae964c10bc8951e76d61b4e64f
rivenelemcheat.exe – a Projector with “cheat” mode enabled, in case you need a little help SHA-1 hash: cf718dc85e69d20fffb83c53cd2b35272dac53cb
rivenelem.dcr – the original Macromedia Shockwave file, used by the Projectors SHA-1 hash: a37395cad4bc9de20fef6f1eeafa8b89c7a62af2
dswMedia folder – images used by the game, originally pre-loaded during the intro screens
Speaking of early internet web games based on Riven (such an incredibly niche topic!), if you haven’t seen it before check out the Riven Journals Restored. It’s another online game based on Riven I’ve also restored, this one originally made as part of the lead-up to Riven’s release. The puzzles were originally written in Java but they’ve been rewritten in JavaScript to work on modern browsers.
Happy 25th anniversary, Riven!
Like this game?
Did you find this fun? Donate to my Ko-fi, comment below or drop me a line to say thanks! The more donations/encouragement I receive, the more likely I am to write more articles, guides, tools & games like this in the future.
So, first off, the primary intended audience of this post is current/future members of HSBNE aka Hackerspace Brisbane. If you’re wondering why I’m writing this here somewhere open & public, it’s partly because I’m being blocked from posting it in the forums, but also because saying these things only in private has only allowed the bad behaviour to flourish. This censorship is wrong; if you can’t discuss issues then you can’t hope to fix them. It’s even worse when this censoring is being used to hide evidence of wrongdoing so members don’t know what’s really happening at their own space. But that’s the currently acceptable standard at HSBNE, and frankly, I don’t think the average member would agree with what’s actually being enforced if they knew it was happening.
For the newer members who don’t know me, I’m Mike & I’ve been a very active HSBNE member & volunteer for 8 years until recently. I’ve spent nearly a decade helping build HSBNE up as best as I can, and I still want it to succeed as much as possible. It’s a one-of-a-kind place, after all. But I’m deeply concerned that the direction it’s taking will cause the place to implode, and the fact that members aren’t permitted to know the direction it’s taking is incredibly worrying to me. I think it’s fair to say that anyone who volunteers to improve HSBNE does so because they want to make it a better place, however what’s “better” is sometimes a matter of opinion. For instance, wanting to portray HSBNE in the best possible light has been a thing for as long as I can remember, and in general it’s a good thing. Unfortunately, with time that’s morphed at first into hiding structural issues that are wrong without fixing them, into discouraging members from bringing them up, into outright punishing anyone who mentions them. This is an incredibly dangerous anti-pattern, because it not only perpetuates the original problem, it ends up actively encouraging it and the problematic behaviour increases. Bad things happen at all organisations and HSBNE is not some magical exemption; it’s how you deal with them that matters most.
I have been experiencing discrimination and defamation at HSBNE and I’m both being blocked from even telling other members this has occurred and also being actively prevented from having any opportunity to clear my name. This has even gone as low as lying about and attacking me for my disability. Because all my attempts to get these issues resolved internally have failed, I’m forced to take it externally with legal options. As such, I’ve filed a complaint with the Australian Human Rights Commission about the treatment I’ve received at HSBNE. I would like to share more details, but out of respect for the process & the current executive it’s best to avoid publicly discussing active complaints. So I’d ask anyone reading this to withhold your judgement if you have heard rumours about me as I have evidence backing me up that multiple members have been lying about me.
I’d also like to bring attention to sexual assault & sexual harassment happening at HSBNE. Yes, this is clearly against HSBNE’s rules, but that would require the rules to be enforced. A few years ago I was sexually assaulted by another member. I mostly shrugged it off at the time, until I was at a party last year where I mentioned HSBNE and the person I was speaking to said they quit after they were sexually harassed by the same member. Another person at the party overheard us and said they were also sexually harassed at HSBNE, but by a different member, and they said the place has a reputation for providing safe harbour to sexual predators. I messaged some other ex members that I felt left for suspicious reasons, and before I knew it the number was over half a dozen. This appears to have been happening for a period of time and there’s potentially more cases out there too. This is a perfect example of how silence is helping perpetuate this system as those responsible can keep getting away with it. I’ve debated how much information I should share about my case to warn others, but the fact that the systems are so broken at HSBNE that this keeps happening is far more worrying to me than my own incident, so I’ll just say that there are still active HSBNE members who have sexually harassed other members and visitors. I won’t be naming people for my own safety, fearing retribution, but I’ll simply recommend that women, fem presenting and vulnerable people avoid HSBNE, as my experience has shown that no action will be taken by the HSBNE executives to protect victims of these crimes.
In saying all this, I withdraw all past recommendations I’ve given for HSBNE aka Hackerspace Brisbane, particularly if you’re a woman, fem presenting, vulnerable or disabled person. I cannot in good conscience continue to endorse a place that is not a safe space and where the rules are borderline worthless and enforced unequally.
EDIT: Since I originally posted this, I’ve been private messaged by some ex HSBNE members. The number of incidents of sexual harassment I’m aware of has now increased by 3. Tell me with a straight face there isn’t a problem.
EDIT2: In case anyone tried to write off this post as just one member’s ranting, another core member has made two similar blog posts, covering the above plus other issues I also agree with but was scared of mentioning myself lest I suffer retaliation for calling them out. Speaking of retaliation, I’ve been given a Schedule Three 3-month ban aka the toughest ban available, for filing a complaint with the Australian Human Rights Commission. This is not an exaggeration or misleading or putting words in their mouth; filing the complaint was the only reason given for the ban. I’m saying this as a warning to any current/future members about what the current executive consider punishable/forbidden behaviour, such as trying to enforce the law when it’s been broken. Also, the rule used to justify this punishment was not brought in through the usual public discussion/vote by membership route, it bypassed all this to be rushed in unilaterally by the current executive under their override powers with just an announcement that it was now in effect, placing the onus entirely on them. I will not be commenting further on this highly illegal ban as it will be addressed as part of the AHRC proceedings.
EDIT3: The complaint with the Australian Human Rights Commission concluded with no resolution. HSBNE flatly refused to acknowledge or do anything about even the most serious examples of illegal behaviour, even when presented with hard evidence and direct quotes of the laws that had been broken. Reporting illegal human rights violations remains a bannable offense at HSBNE, while committing human rights violations continues to be treated as acceptable behaviour. There were zero changes made to prevent this from happening again to others in the future. Given this, there’s no way any reasonable person could describe HSBNE as a Safe Space, but that is exactly what they continue to falsely label themselves as. This post’s warning about the institutionally-engrained abusive attitudes of the organisation remains valid. Further details in this update post.
I’m Mike Ando, a time-travelling mad scientist. DeLorean driver. Satellite owner. Inventor. Potato connoisseur. Once on Beauty & the Geek Australia, now a Professional Geek.


. From left to right: 12V Meanwell power supply, Pololu Shunt Regulator, Raspberry Pi 4 with DAC+ shield, Arduino Pro Mini, DFRobot DRI0042 Motor Driver.")