Peanut Butter Jelly Time Banana Cosplay, Red Sound Box
For the 2018 Supanova pop culture convention in Brisbane, Australia I had the ridiculous idea to make three very similar costumes following three rules:
- Internet memes
- That are at least 15 years old
- Involving a giant banana
I still can’t believe that I managed to get three costumes out of something so restrictive.
To go with this costume I made a red sound box to play music that I could dance to. That’s mostly what I want to write about on here, but let’s just get the costume photos out of the way first.
Friday’s costume: ring ring ring ring ring ring ring, BANANAPHONE!
Saturday’s costume: it’s Peanut Butter Jelly Time!
Sunday’s costume: Rejected by Don Hertzfeldt’s My Spoon Is Too Big (which, by pure luck, was re-released in 1080p just two weeks before the convention)
As you can no doubt tell, I spared no expense with these costumes.
The red sound box was one of those things that “should” have been easy, but because I used cheap Chinese parts & left it to the last minute, it became a giant cascade of one hack after another. The idea was to have a button that when pressed played a short piece of music to accompany that day’s costume variation. I wanted the front button to be super enticing so other people would want to press it, and nothing’s more enticing than a giant glowing red button. I eventually got there with everything, but it ended up way more complicated than I had anticipated.
(YouTube link in case the above video doesn’t work for you)The software on the box isn’t too complicated – press the button, music plays for a bit (just the first stanza). Press it again while it’s still running, it’ll play a little longer. The list of stanza stopping points was all pre-calculated per song. I’ll say right now, with anything like this it’s very important to consider how trolls could abuse what you’re building. In this case if someone ran up, pressed it a dozen times in quick succession then ran off, it only extended the music by at most one stanza beyond what’s currently playing – if you wanted to keep the music going you had to stay there and keep on pressing it as each stanza plays. And yes, many people tried doing that – much to their frustration when it didn’t work.
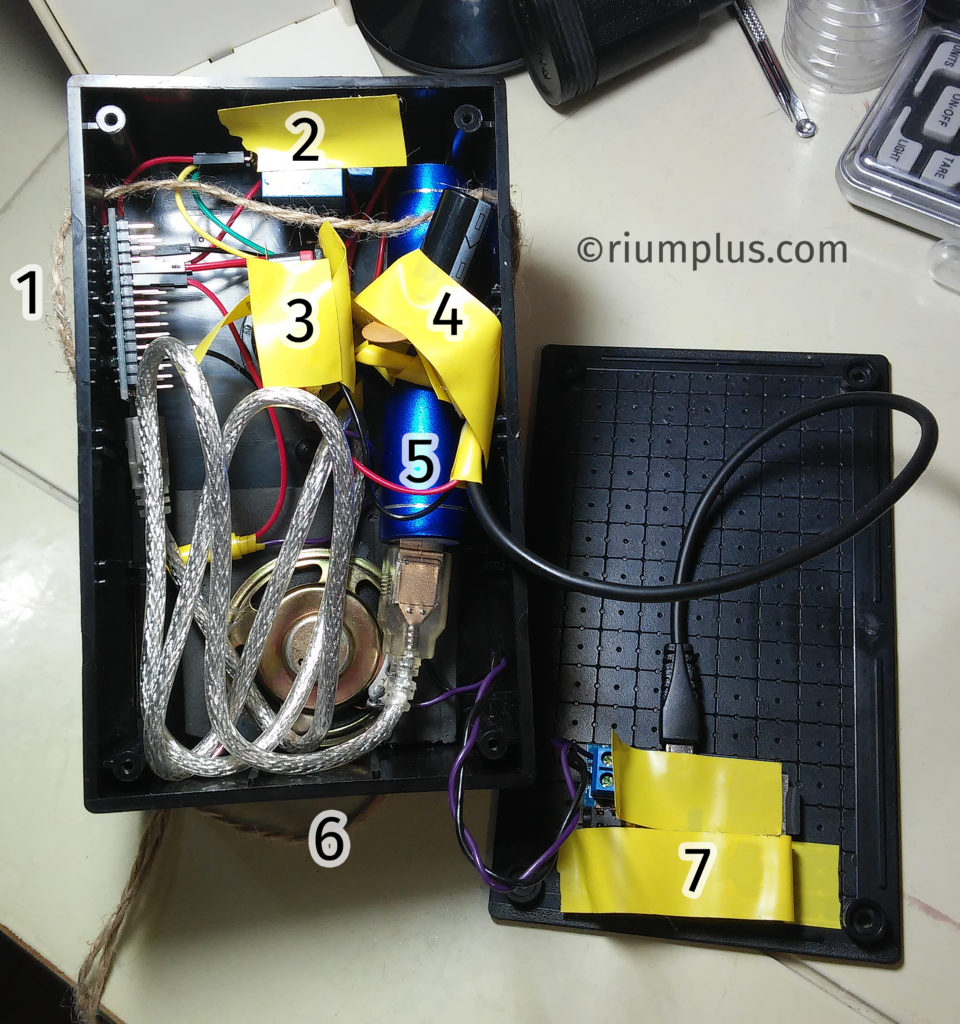
Here’s a numbered photo of the box’s innards, showing that copious quantities of hot glue & electrical tape are totally valid mounting & insulating techniques.

1) Arduino Nano 168p, 2) 5V relay board, 3) Red button light & microswitch, 4) Capacitors, 5) USB power bank, 6) Speaker, 7) MP3 board
Hacks & Slashes
Now for some of those hacks I mentioned:
- The cheap Chinese Arduino Nano’s (#1) that I had bought were supposed to be based on the ATmega328P chip, however when I plugged them in they were actually using the ATmega168P. The 168 has only 1024 bytes of RAM instead of 2048, and that’s not enough to read data off a microSD card & send it to an MP3 shield for playback. This meant I had to use a different music shield with its own on-board microSD card that accepts play/stop control commands. I probably should’ve bought the right Arduino instead, but hindsight & all that.
- The second cheapo MP3 shield I tried had no on-board amplifier. I bought a cheap eBay amplifier for it, but for whatever reason the amplified sound quality was atrocious – worse than a fast food drive-through speaker. So I had to change to yet another music board (#7), this one even simpler – apply power, it played the first song on its microSD card, and it had manual buttons I could tap into to control it beyond that.
- This worked great on a breadboard on my desk, but when all installed into the box there was too much electrical interference – likely because the speaker’s (#6) magnetic coil was right below the music board (#7). I could start the board, and control playback when it was playing music very quietly, but I lost the ability to control it or even stop it when playing music above a certain volume. Given I was running out of time and all I really needed was to just start & stop the music, I decided to use the sledge hammer approach. By which I mean I added a 5V relay board (#2) to manually supply & cut all power to the music board (#7) to control it that way instead. Insert an “I’m done asking nicely” reference here.
- This worked, but only intermittently – the relay’s (#2) inrush current was large enough to cause the Arduino to sometimes reset from the voltage sag, particularly when running off the battery and not my bench power supply. So, I added a ceramic & electrolytic capacitor that I had lying around (#4), and this fixed the voltage droop problem.
- …But it created another problem. The USB power bank (#5) I was using couldn’t handle the huge inrush current required to charge up the capacitors when you first turned it on. Rather than do something sensible like swap batteries or reduce the capacitor values, I wired them up so the USB bank went straight to the Arduino’s USB point (#1) but the capacitors were connected via the Arduino’s pins, in effect using the thin traces on my knock-off Arduino as inrush current limiters to the capacitors. This is what peak hack looks like.
- The USB power bank (#5) had another issue – since this was a power bank not a power supply, it was designed for charging things, not powering devices. As such, it automatically turned off if it thought the device it was connected to was fully charged. The clever hack to get around this was to reduce the value of the resistor to the glowing red button (#3), making it use more current & shine brighter, and altering the button’s pulsing pattern. This was enough to trick the USB power bank into staying on. Remember folks, if it’s a stupid hack but it works, it’s not stupid.
- For whatever reason, at the convention centre the button kept on accidentally triggering. Experienced cosplayers know that it’s always a good idea to shield, isolate & over-build anything electronic on your cosplay – the Brisbane Convention & Exhibition Centre main hall is well known as having a lot of stray RF noise inside it during a con. As I had access to a laptop during the convention, I ended up modifying the code multiple times throughout the convention to incrementally harden it. I ended up adding my own external pullup/pulldown resistors around the place as I didn’t trust my knockoff boards to actually have them, I switched from a digital input pin to an analogue input pin for the button, I required reading a value of at least 992 out of 1023 from the button’s pin (which for a 5V system is around 4.85V or higher), for 200ms straight without dipping for even a single moment, to trigger the music. This still resulted in a random trigger every couple of hours. Dat RF noise.
- Finally, hot gluing the speaker (#6) in place introduced a lot of reverb from mounting it by a mostly-solid method to the case’s fixed plastic. A sheet of ~1cm thick EVA foam was used as a decoupling spacer between the speaker & the case, and this solved all the bad audio quality issues.
If I had one piece of advice I learned from this project, it’s that knock-off parts from China can get you by if you’re on a budget or while you’re testing things, but for the final version I absolutely recommend purchasing the genuine products. This project would’ve taken me a fraction of the time it did if I had just spent a little extra for quality parts in the beginning.
(If I had a second piece of advice, it would be to set yourself a deadline well before something’s due. That way you’re not stuck hacking things together at the last minute from whatever you’ve got on hand plus what you can buy locally at exorbitant prices… But we both know neither you nor I are ever gonna actually do that one)
(YouTube link in case the above video doesn’t work for you)This audio box’s going to be disassembled shortly, because I need some of its parts for another project (and it also served as a semi prototype of yet another underway project… I have too many things in progress).
Happy hacking!


There are no comments yet, add one below.
Leave a Reply